Flare-on Challenge 2019 Write-up
Another year of Flare-on challenge ! As a guy who’s interetesed in reverse engineering, this is definitely a great chance for me to practice/sharpen my reversing skills ! This year it has 12 challenges covering Windows PE, Linux ELF, Android apk, NES ROM …… and over 5,700 participants !
Final rank : 197/5790, not bad for an amateur reverse engineering lover 😄 In fact I’m just glad I was able to finish it this year, since I was kind of busy during the challenge and can only solve those during my free time. Like the previous one, I’ll share my solution of each challenge – how I solve it, what tools did I use, …etc. Feel free to discuss the challenge in the comment sections below 🙂
You can also check the official write-up here.
Level 1
Tool : dnSpy
We were given a .NET binary program, which is a simple cat shooting game – you enter the weapon code and press the fire button. If the weapon code is correct, the cat will fire the weapon. There are two stages, each stage has a different weapon code. All we need to do is enter two weapon code correctly and it’ll show us the flag.
By using dnSpy, we can quickly figure out that the first weapon code is “RAINBOW” ( plain text ) and the second one is “Bagel_Cannon” ( simple XOR decryption ). Enter those weapon code and we’ll get the flag:

flag: Kitteh_save_galixy@flare-on.com
Level 2
Tool : IDA Pro, x64dbg
Given a PE32 executable, once we execute the program it will pop out a message box saying: “I never broke the encoding:”.
After analyzed the binary with IDA, we can see that it took data from a global buffer and did some operation, then show the result in message box:
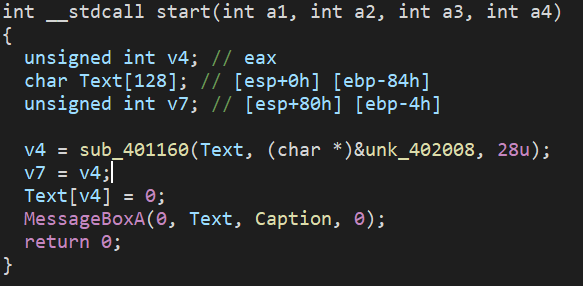
The third parameter of sub_401160 ( 28 / 0x1c ) indicates the length of the processing data. However, by checking the data of unk_402008, we’ll notice that it’s way more than 28 bytes.
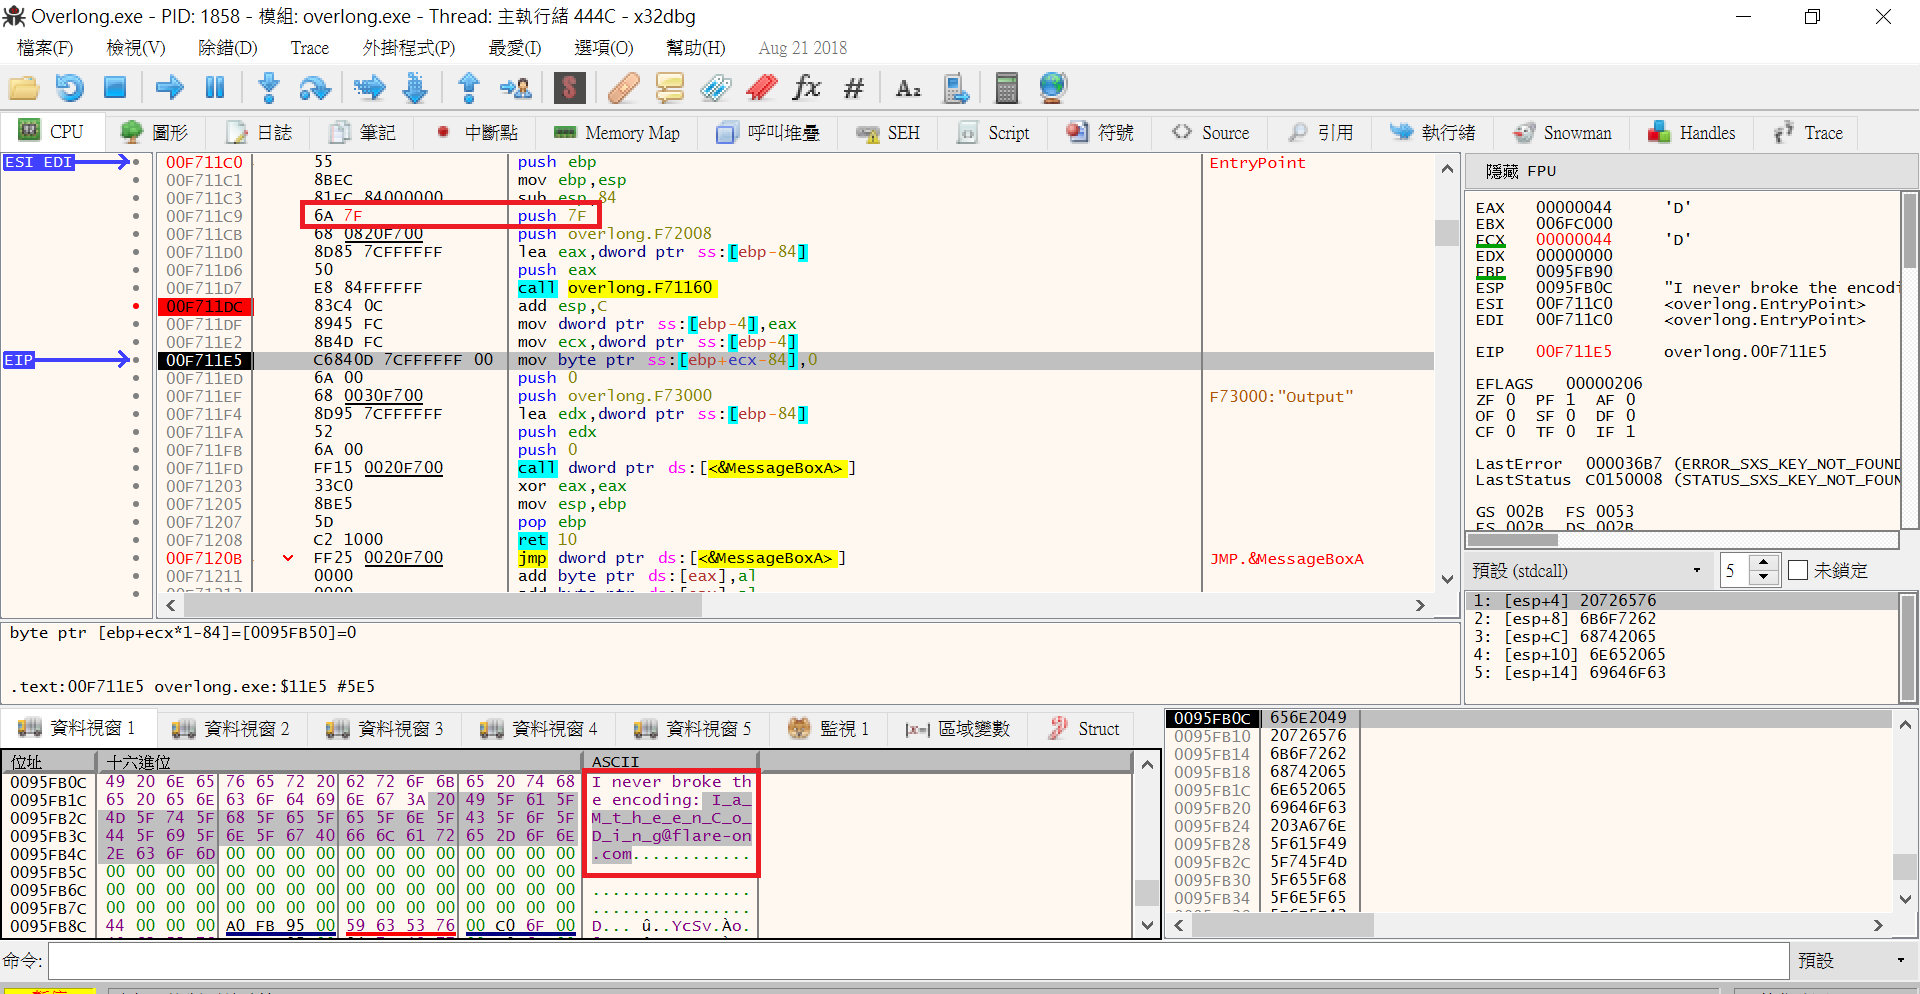
So here I just launch the program with x64dbg and patch the instruction ( push 0x1c –> push 0x7f ) so it will process more data bytes. After that we’ll see the flag in the data view:
flag: I_a_M_t_h_e_e_n_C_o_D_i_n_g@flare-on.com
Level 3
Tool : AndroTamer VM, Frida
This time we were given an apk file. It’s a simple Tamagotchi pet game, we can feed/play/clean a Flarebear.
Here I’m using AndroTamer to analyze the apk. It’s basically a VM with lots of Android analyzing tools installed in it. For static analysis, I use dex2jar and jd-gui to view the decompiled java code. As for dynamic analysis, I use Android Studio and Frida to do the analyzing.
First I analyzed the decompiled java code and figured out the main logic:
- The app will record the amount of how many times does the user feed/play/clean the Flarebear.
- It will use these numbers to check if the Flarebear is “happy” and “ecstatic”.
- If so, use these numbers to calculate the password, then use the password to decrypt and show the flag.
By analyzing the code in the isHappy() and isEcstatic() methods, we can sort out the checking logic:
1
2
3
4
5
6
7
8
9
10
11
// f = amount of feed
// c = amount of clean
// p = amount of play

isHappy:
f/p >= 2 && f/p <= 2.5

isEcstatic:
-2p + 10f = 72
4p - c + 2f = 30
6c - f - p = 0
We can easily solve the equation by hand : f = 8, c = 2 and p = 4
The next thing to do is getting the flag. Normally we could just play the game, feed/play/clean the Flarebear with the correct amount and show the flag. However since I’ve wanted to play with Frida for so long, I decided to use a different approach: hook the function with Frida, then get the flag with just one click.
The first thing to do is to installed the app and frida-server into the emulated AVD:
- Create and launch an AVD with Android Studio & AVD manager.
- For installing the app, drag the app into the virtual device.
- Following the steps in this link, I downloaded the frida server from the release page, push it to the virtual device and launch the server in background.
- Launch the app with the following command:
1
adb shell am start -n com.fireeye.flarebear/com.fireeye.flarebear.MainActivity
Now we can use frida-ps -U to check if there’s a com.fireeye.flarebear process in the emulator. If so, we then can start writing some script and hook the function in the app.
With these two useful link ( link1, link2 ), I started learning how to use Frida with javascript and python. Basically, Frida use javscript to inject the code in app, and frida-python is used for automating the hooking process.
So first I wrote the following python script to hook the app automatically:
1
2
3
4
5
6
7
8
9
10
11
12
13
14
15
import frida
import time

device = frida.get_usb_device()
# start app
pid = device.spawn(["com.fireeye.flarebear"])
device.resume(pid)
time.sleep(1) # Without it Java.perform silently fails
# attach frida to app
session = device.attach(pid)
script = session.create_script(open("hook.js").read())
script.load()

#prevent the python script from terminating
raw_input()
Now we can focus on hook.js. To show the flag, we’ll have to hook three functions:
isHappy(): Always return trueisEcstatic(): Always return truegetStat(): For returning the correct amount of f/c/p
1
2
3
4
5
6
7
8
9
10
11
12
13
14
15
16
17
18
19
20
21
22
23
24
25
console.log("Script loaded successfully ");
Java.perform(function x() {
    console.log("Inside java perform function");
    //get a wrapper for our class
    var my_class = Java.use("com.fireeye.flarebear.FlareBearActivity");

    // hook getStat to return correct amount of f/c/p
    my_class.getStat.implementation = function(x){
        console.log("getStat: "+x);
        if (x == 'f') return 8;
        if (x == 'c') return 2;
        if (x == 'p') return 4;
    }
    // hook isEcstatic, always return true
    my_class.isEcstatic.implementation = function(){
        console.log("Inside isEcstatic !");
        return true;
    }
    // hook isHappy, always return true
    my_class.isHappy.implementation = function(){
        console.log("Inside isHappy !");
        return true;
    }
});
Now run the python script, it will start the app in virtual device. With just one click ( just press one of the feed/play/clean button ) the app will show us the flag:
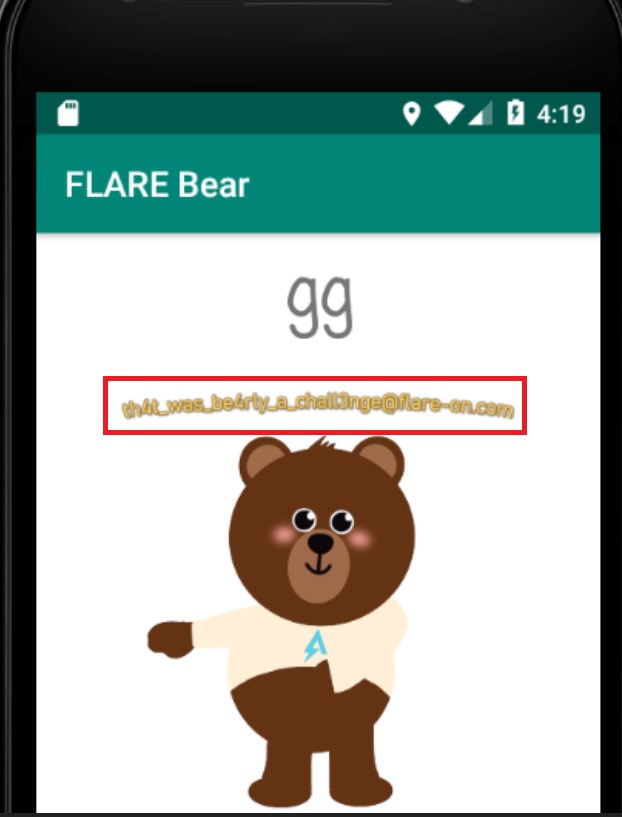
flag: th4t_was_be4rly_a_chall3nge@flare-on.com
Really fun challenge, learned tons of stuff about Android app analysis, especially Frida :)
Level 4
Tool : IDA Pro, Wireshark, gdb
We were given two 64 ELF binaries: ChessUI and ChessAI.so. ChessUI is a GUI program ( a chess game ), it will dynamically load ChessAI.so and use the function inside the library to decide where to move the chess next round. Also we were given a pcap file, which contain some suspicious network traffic ( obviously has something to do with those two programs ).
The code that generate the network traffic is in the getNextMove() function ( in ChessAI.so ). The function will send a DNS query base on the move of user’s chess. For example, if user move rook from c3 to c6, it will send a DNS query of “rook-c3-c6.game-of-thrones.flare-on.com”. Once the server has respond the request, it’ll take the IP address of the host name and do some checking and calculations. Here I only list the most important part of the code:
1
2
3
4
5
6
7
8
9
10
11
12
13
14
// if ip = 127.0.0.1
// ip[0] = 127, ip[1] = 0, ...etc
// round = AI's round, start from 0

// ........omitted........

if ( ip[0] != 127 || ip[3] & 1 || round != (ip[2] & 0xF) )
    return 2LL;

sleep(1u);
// byte_4060 stores the encrypted flag
byte_4060[2 * round] = ip[1] ^ byte_2020[2 * round];
byte_4060[2 * round + 1] = ip[1] ^ byte_2020[2 * round + 1];
// ........omitted........
Basically it checks if the IP address matches a specific format. If it does, decrypt the data buffer with simple XOR operation.
Since we already have the network traffic, all we need to do is extract all the IP addresses from pcap, then write a simple IDAPython script to decrypt the flag.
At first I tried to decrypt the flag with the same order as the pcap file. However it failed, and that’s the moment I notice that the order of the IP address is kind of weird. For example, the first IP address in pcap is 127.150.96.223. However, according to the check, ip[3] ( in this case 223) & 1 should be 0 instead of 1. Moreover I found that there were many IPs that didn’t pass the round == (ip[2] & 0xF) check. Later I found that the last IP address – 127.53.176.56 is the only IP that will pass the check while round equals to 0. That’s the moment I realized that inside the pcap, the order of the DNS request ( = the responded IP ) is completely random – we’ll have to recover the order as well.
However I was too lazy to do that. Instead I just wrote a loop and brute-force the order of the IP address:
1
2
3
4
5
6
7
8
9
10
11
12
13
14
15
16
17
18
19
20
21
22
23
24
25
26
27
28
29
30
31
32
33
34
35
# IDAPython script
ips = [3747649151, 1523907711, 649189247, 3480647295, 1411799423, 1637576063, 1713756543, 238760319, 412333695, 193921151, 2334843775, 4081083775, 1733675391, 1816971391, 390279807, 2002820479, 2063426431, 1548360063, 531343487, 3743782015, 169372799, 234562943, 1490625151, 871250303, 2473051263, 2920189311, 2735206015, 1760028287, 1339832191, 766228607, 3348284543, 4216242047, 715300735, 1328593023, 2065530751, 589479807, 3172337023, 932047231, 1375352703, 951072127]

g4060 = [0]*40
g2020 = [0]*40

def read_gdata():
    for i in xrange(40):
        g4060[i] = Byte(0x4060+i)
        g2020[i] = Byte(0x2020+i)

read_gdata()
# Using brute-force to find the IP-round pair
for cnt in xrange(15):
    for ip in ips:
        v10 = []
        v10.append(ip&0xff)
        v10.append((ip>>8)&0xff)
        v10.append((ip>>16)&0xff)
        v10.append((ip>>24)&0xff)

        if v10[0] != 0x7F or (v10[3] & 1) != 0 or cnt != (v10[2] & 0xF):
            # Wrong IP for this round, try next one
            continue
        # Correct IP for this round, decrypt flag
        g4060[2*cnt] = v10[1] ^ g2020[2*cnt]
        g4060[2*cnt + 1] = v10[1] ^ g2020[2*cnt + 1]

        if (v10[3] >> 7) == 1:
            print "Win!"

        break

print ''.join(chr(c) for c in g4060)
print "Done!"
flag: LooksLikeYouLockedUpTheLookupZ@flare-on.com
Level 5
Tool : IDA Pro + Windbg, x64dbg
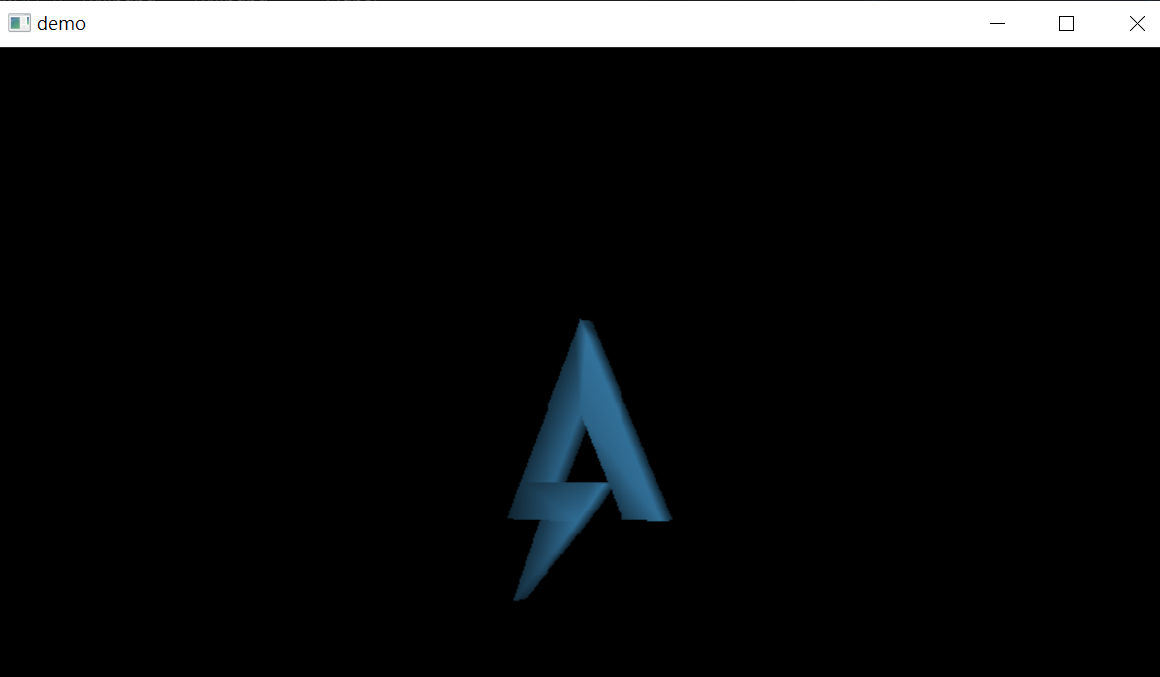
This time we were given a program which displays a window and shows a spinning FLARE logo:
The program was packed twice. In order to analyze it, we’ll have to unpack it first. Here I used x64dbg to launch the program and quickly locate the entry point. However I was not able to dump the binary with its Scylla plugin 😕 it kept dumping the wrong binary file, so in the end I have to analyze the code with the debugger attached to the binary.
So I switched to IDA Pro + Windbg to do the analyzing. However unlike x64dbg, IDA sometimes failed to disassemble the unpacked code and cause some inconvenience during the debugging, I had to step through the code very carefully for not making IDA disassemble the wrong code. In the end I decided to switch between x64dbg and IDA to analyze the program – x64dbg for locating the code position & dynamic analysis, and IDA for decompiling the unpacked code.
After some static analysis, I kind of figured out the main logic of the program ( I’m not familiar with DirectX though, so some terms might be incorrect ):
- Create a Direct3D object and device for showing the object.
- Create two mesh objects.
- Start showing ( spinning ) the 3D object and wait for exit ( the ESC key ).
I noticed that even the program created two mesh objects with different sets of vertices/faces, it only shows one 3D object in the window. Guessing the flag might be one of the mesh object, I started testing my theory with x64dbg.
The program store the mesh objects at 0x430050 and 0x430054, so:
- After the program created the first mesh object, skip the second one and store the first object to
0x430050and0x430054. - However, the program still shows the FLARE logo.
- So this time skip the first object and store the second mesh object to
0x430050and0x430054. - This time, it shows us the flag :)
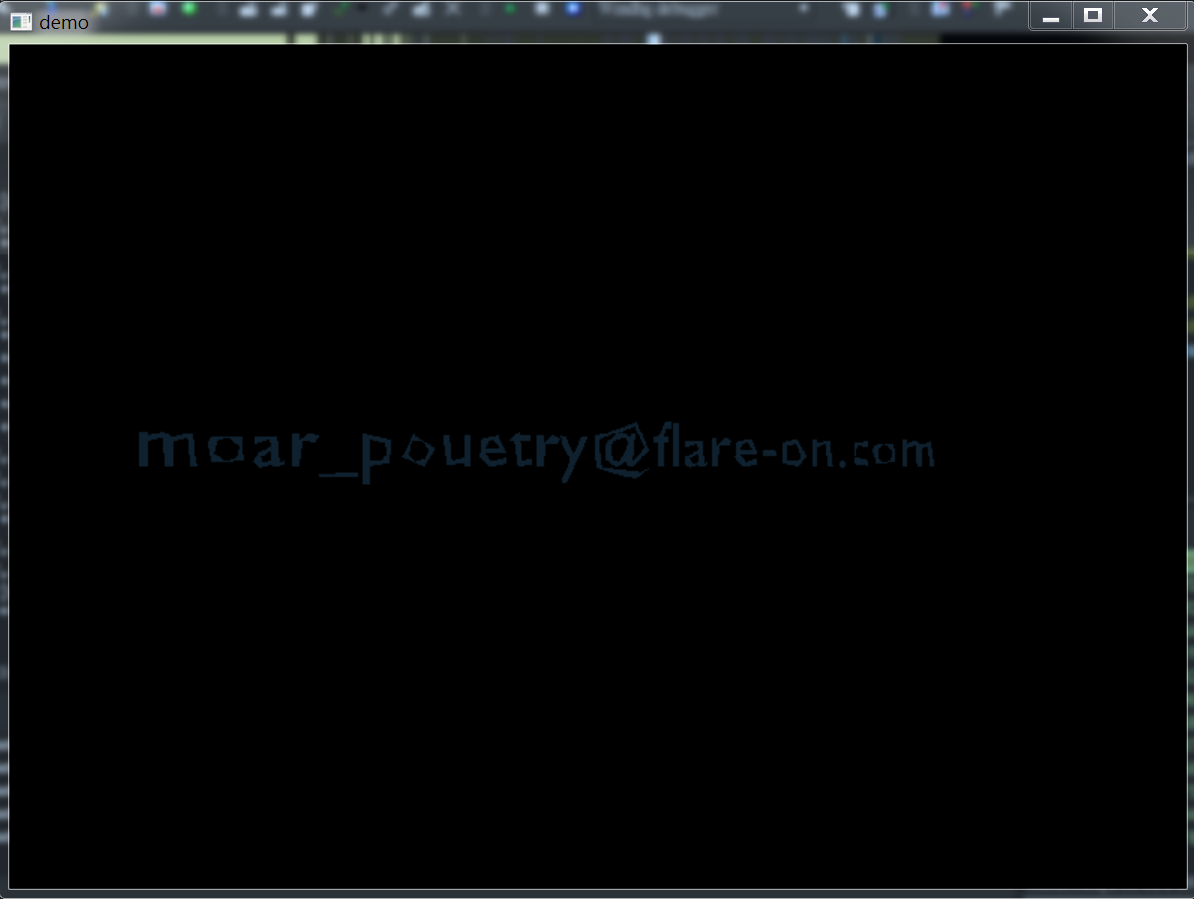
flag: moar_pouetry@flare-on.com
Level 6
Tool : dnSpy, 010 editor
Level 6 is a .NET binary, which is a simple command line tool that can hide some information inside an image. We can use the following command to execute the program:
1
./bmphide.exe ./in.bmp ./secret ./out.bmp
It will hide the data bytes of secret into in.bmp and save it to out.bmp. In this challenge, we’ll have to recover the information from the image file image.bmp.
Let’s open up dnSpy and start figuring the program logic. The main function is pretty simple:
1
2
3
4
5
6
7
8
9
10
11
12
13
14
15
16
17
main()
{
    // Initialize some data
    Program.Init();
    Program.yy += 18;
    // read arguments
    string filename = args[2];
    string fullPath = Path.GetFullPath(args[0]);
    string fullPath2 = Path.GetFullPath(args[1]);
    byte[] data = File.ReadAllBytes(fullPath2);
    Bitmap bitmap = new Bitmap(fullPath);
    // process the secret data
    byte[] data2 = Program.h(data);
    // Hide the information in the image and save the result
    Program.i(bitmap, data2);
    bitmap.Save(filename);
}
Knowing the main logic is in Program.h() ( processing the secret data ) and Program.i() ( hiding the information ), I started implementing those functions with python. First is Program.h():
1
2
3
4
5
6
7
8
9
10
11
12
13
14
15
def h(data):
    array = [0]*len(data)
    num = 0
    for idx in xrange(len(data)):
        num2 = f(num)
        num+=1
        num3 = ord(data[idx])
        num3 = e(num3, num2)
        num3 = a(num3, 7)
        num4 = f(num)
        num+=1
        num3 = e(num3, num4)
        num3 = c(num3, 3)
        array[idx] = num3
    return array
It uses function like f(), e(), a()…etc, with dnSpy we can see it’s just some simple shift/xor/and/add/sub operation. f() is a RC4-like function though, but still it’s easy to implement. Next is the Program.i() function, here’s the C# code from dnSpy:
1
2
3
4
5
6
7
8
9
10
11
12
13
14
15
16
17
18
19
20
21
22
public static void i(Bitmap bm, byte[] data)
{
    int num = Program.j(103);
    for (int i = Program.j(103); i < bm.Width; i++)
    {
        for (int j = Program.j(103); j < bm.Height; j++)
        {
            bool flag = num > data.Length - Program.j(231);
            if (flag)
            {
                break;
            }
            Color pixel = bm.GetPixel(i, j);
            int red = ((int)pixel.R & Program.j(27)) | ((int)data[num] & Program.j(228));
            int green = ((int)pixel.G & Program.j(27)) | (data[num] >> Program.j(230) & Program.j(228));
            int blue = ((int)pixel.B & Program.j(25)) | (data[num] >> Program.j(100) & Program.j(230));
            Color color = Color.FromArgb(Program.j(103), red, green, blue);
            bm.SetPixel(i, j, color);
            num += Program.j(231);
        }
    }
}
We can see that it uses the value from Program.j(XXX). Since I was too lazy to implement Program.j(), I decided to launch the debugger in dnSpy and extract those values from memory. While doing this, I found that the program had trigger the “StackOverflow Exception” while doing Program.Init(). At first I thought it has something to do with the bug in dnSpy, so I just skip through the code in Program.Init(). There were many code in Program.Init() that I can’t understand, must be some unimportant code ;) ( Boy I was so wrong… ). After that we can just replace those Program.j() with the value we extracted earlier in our python version of Program.i(). So far so good.
NOTE: According to the offcial write-up of level6, the StackOverflow Exception is actually an anti-debug trick. You can check the write-up for more details.
However I soon found out that this isn’t the right approach – my python version of bmphide behaved differently from the .NET version. I’ve checked the logic in each function, and everything seems to be correct, so where’s the problem ? Oh I don’t know, maybe go check that Program.Init() function again -_- ?
In the end I found that it did has something to do with the Program.Init() function. It initialized the Program.zz, Program.yy and Program.ww data, and those values are used by Program.j() ( I did not implement it so I didn’t notice that ). Also it apparently modified some code in the binary, making its program behavior different from what we see in dnSpy.
To figure out what’s actually happening I have to attach the debugger to bmphide.exe so it won’t terminate while doing Program.Init().
TIP: By providing a large
secretfile in command line, we’ll be able to attach the dnSpy debugger to the process just in time.
I first re-extract those values generated by Program.j(), then start analyzing the code in Program.h() – and that’s the moment I realized where the problem was : when I tried to step into Program.f(), it actually jumped to Program.g() ! And not only f(), a() and c() also jumped to a different function, what the hell ?! Apparently, Program.Init() is doing something evil, which make me have to modified my python version of Program.h() into:
1
2
3
4
5
6
7
8
9
10
11
12
13
14
15
def h(data):
    array = [0]*len(data)
    num = 0
    for idx in xrange(len(data)):
        num2 = g(num) # not f
        num+=1
        num3 = ord(data[idx])
        num3 = e(num3, num2)
        num3 = b(num3, 7) # not a
        num4 = g(num) # not f
        num+=1
        num3 = e(num3, num4)
        num3 = d(num3, 3) # not c
        array[idx] = num3
    return array
Now we have a python version of bmphide right ? Nope, this python bmphide still behave differently from the original one. So again, I have to attach the debugger in dnSpy and see what’s going on, and this time, it has something to do with the dnSpy’s decompiled C# code:
1
2
3
4
5
6
public static byte g(int idx)
{
    byte b = (byte)((long)(idx + 1) * (long)((ulong)-306674912));
    byte k = (byte)((idx + 2) * 1669101435);
    return Program.e(b, k);
}
In dnSpy we see that Program.g() first generate b & k with (idx+1)*0xedb88320 and (idx+2)*0x637c777b. However, if we open the disassembly view, it shows something different:
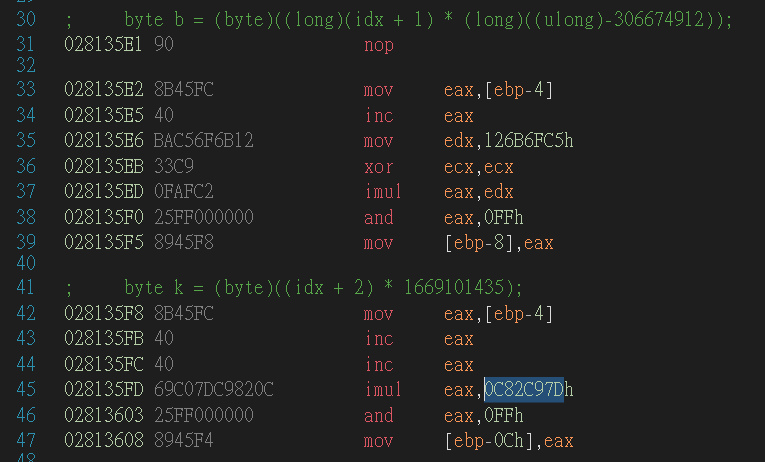
It’s actually doing ((idx+1) * 0x126B6FC5) and ((idx+2) * 0xC82C97D). Again, what the f*ck ?
NOTE: According to the official write-up, it’s because it uses several obfuscation techniques including JIT hook to overwrite the code during runtime 😮 That’s why the code behavior is different from the one that dnSpy shows us !
So after I modified the g() function in my python bmphide, the code finally behaves identical to the original version.
Finally we can start recovering the hidden message. First we’ll have to recover data2, the encrypted data generated by Program.h(). This is easy since all we need to do is to extract the last 3 or 2 bit of the RGB pixel and we’re done:
1
2
3
4
5
6
7
8
9
10
11
data2 = []
num = 0
for x in xrange(width):
    for y in xrange(height):
        R, G, B, A = bitmap.getpixel((x, y))
        d1 = R & 7
        d2 = G & 7
        d3 = B & 3
        data = (d3<<6) | (d2<<3) | d1
        data2.append(data)
        num += 1
Next is to recover the original message. To do this we’ll have to solve the numbers that were used by e(), b() and d(). Since it’s just 1 byte of data, this can be done by some brute-forcing. You can find the cracking script here.
Since I didn’t know the actual length of the hidden message, I first recovered the first couple of bytes and notice that it’s a BMP file as well. With the help of 010 editor I was able to get the size of the image and recover the message with the correct length of data.
Notice that the hidden message of image.bmp is another BMP file ( no flag in the image ), we’ll have to recover the message in that image in order to get the flag of the challenge.

flag: d0nT_tRu$t_vEr1fy@flare-on.com
Level 7
Tool : Pyinstaller Extractor, uncompyle6, x64dbg, Z3
This time we were given a pyinstaller executable wopr.exe ( python version 3.7 ), which is apparently named after the computer from the movie WarGames. After we launch the program and enter the “play g” command ( g stands for “GLOBAL THERMONUCLEAR WAR” ), it will ask us to input the correct launch code.
To find the correct launch code, first thing we need to do is extract the source files from the pyinstaller. With Pyinstaller Extractor, we can extract those files and find that the source code is hidden in the pyiboot02_cleanup file. Next thing we need to do is decompile pyiboot02_cleanup with uncompyle6 and get the python source code. However the file is missing the pyc header. In order to get uncompyle6 working, we’ll have to fix its header. This is easy though, just extract the header from an existing python3.7 pyc file and fix the header manually.
After that we’ll get the following python source code:
1
2
3
4
5
6
7
8
9
10
11
12
13
14
15
16
17
18
19
20
21
22
23
24
25
26
27
28
29
30
31
32
33
34
35
36
37
38
39
40
41
42
43
44
45
46
47
48
49
50
51
52
53
54
55
56
57
58
59
60
61
62
63
64
65
66
67
68
69
70
71
72
73
74
75
76
77
78
79
80
"""
...<omitted doc string>...
"""

import hashlib, io, lzma, pkgutil, random, struct, sys, time
from ctypes import *

print('LOADING...')
BOUNCE = pkgutil.get_data('this', 'key')

def ho(h, g={}):
    k = bytes.fromhex(format(h, 'x')).decode()
    return g.get(k, k)

# print->exec, exec->print
a = 1702389091
b = 482955849332
g = ho(29516388843672123817340395359, globals())
aa = getattr(g, ho(a))
bb = getattr(g, ho(b))
a ^= b
b ^= a
a ^= b
setattr(g, ho(a), aa)
setattr(g, ho(b), bb)

def eye(face):
    leg = io.BytesIO()
    for arm in face.splitlines():
        arm = arm[len(arm.rstrip(' \t')):]
        leg.write(arm)

    face = leg.getvalue()
    bell = io.BytesIO()
    x, y = (0, 0)
    for chuck in face:
        taxi = {9:0,
         32:1}.get(chuck)
        if taxi is None:
            continue
        x, y = x | taxi << y, y + 1
        if y > 7:
            bell.write(bytes([x]))
            x, y = (0, 0)

    return bell.getvalue()


def fire(wood, bounce):
    meaning = bytearray(wood)
    bounce = bytearray(bounce)
    regard = len(bounce)
    manage = list(range(256))

    def prospect(*financial):
        return sum(financial) % 256

    def blade(feel, cassette):
        cassette = prospect(cassette, manage[feel])
        manage[feel], manage[cassette] = manage[cassette], manage[feel]
        return cassette

    cassette = 0
    for feel in range(256):
        cassette = prospect(cassette, bounce[(feel % regard)])
        cassette = blade(feel, cassette)

    cassette = 0
    for pigeon, _ in enumerate(meaning):
        feel = prospect(pigeon, 1)
        cassette = blade(feel, cassette)
        meaning[pigeon] ^= manage[prospect(manage[feel], manage[cassette])]

    return bytes(meaning)

for i in range(256):
    try:
        print(lzma.decompress(fire(eye(__doc__.encode()), bytes([i]) + BOUNCE)))
    except Exception:
        pass
Here are some basic logic of the program:
- It first exchanges the function of
execandprint( meaning that if you callprint(), you’re actually doingexec()) - The
eyefunction take the file’s doc string as the argument and extract two characters:\tand thespacecharacter. Then it treat\tas 0,spaceas 1, and combine the result into a binary buffer ( ex.\t<space>\t\t\t\t\t\t->01000000(0x40) -> write 0x40 to the buffer ) fireis basically RC4 –woodis data andbounceis the key- The
for i in range(256)loop is actually a brute-force loop – it takesbytes([i])+BOUNCE(BOUNCEis taken fromthis\key, which can be extracted from thewopr.exeexecutable ) as the key and tried to decrypteye(doc_string). If the result can’t be decompressed by thelzmamodule, it will try the nextbytes([i])and see if it works. - If it decompress the data successfully, it’ll treat those data as python code and execute it.
Notice that uncompyle6 will replace \t with spaces, so in the end I have to extract the real doc string from pyiboot02_cleanup manually. After that we’ll found that the correct RC4 key is bytes([74]) + BOUNCE. Now we can dump the actual python code. You can check the source code here.
Our input launch_code will be converted into a list x and do some operations, generating list b. It’ll then check if b == h, while h is generated from the memory content of wopr.exe ( check the wrong() function ). In the end I decided to dump the memory content of wopr.exe with x64dbg, and modified the wrong() function into:
1
2
3
4
5
6
7
8
9
10
11
12
13
14
15
16
17
18
19
20
21
22
23
24
25
26
27
28
29
30
31
32
33
34
35
36
37
38
39
40
41
42
43
44
45
46
47
48
49
50
def wrong():

    # read memory dump from disk instead
    trust = open("wopr_00B30000.bin", "rb").read() + \
		open("wopr_00B31000.bin", "rb").read() + \
		open("wopr_00B51000.bin", "rb").read() + \
		open("wopr_00B5D000.bin", "rb").read() +  \
		open("wopr_00B6C000.bin", "rb").read() +  \
		open("wopr_00B6D000.bin", "rb").read() +  \
		open("wopr_00B8C000.bin", "rb").read()

    computer = trust[:1024:]
    dirty, = struct.unpack_from('=I', computer, 60)

    _, _, organize, _, _, _, variety, _ =  struct.unpack_from('=IHHIIIHH', computer, dirty)
    assert variety >= 144

    participate, = struct.unpack_from('=I', computer, dirty + 40)
    for insurance in range(organize):
        name, tropical, inhabitant, reader, chalk, _, _, _, _, _ = struct.unpack_from('=8sIIIIIIHHI', computer, 40 * insurance + dirty + variety + 24)
        if inhabitant <= participate < inhabitant + tropical:
            break

    spare = bytearray(trust[inhabitant:inhabitant+tropical:])

    issue, digital = struct.unpack_from('=II', computer, dirty + 0xa0)
    truth = bytearray(trust[issue:issue+digital:])

    expertise = 0
    while expertise <= len(truth) - 8:
        nuance, seem = struct.unpack_from('=II', truth, expertise)

        if nuance == 0 and seem == 0:
            break

        slot = truth[expertise + 8:expertise + seem]

        for i in range(len(slot) >> 1):
            diet, = struct.unpack_from('=H', slot, 2 * i)
            fabricate = diet >> 12
            if fabricate != 3: continue
            diet = diet & 4095
            ready = nuance + diet - inhabitant
            if 0 <= ready < len(spare):
                # minus 0xb30000 ( the base address displayed in x64dbg )
                struct.pack_into('=I', spare, ready, struct.unpack_from('=I', spare, ready)[0] - 0xb30000)

        expertise += seem

    return hashlib.md5(spare).digest()
Now we can print out h and obtain the answer of b. The rest is write a Z3 python script and solve the launch code:
1
2
3
4
5
6
7
8
9
10
11
12
13
14
15
16
17
18
19
20
21
22
23
24
25
26
27
28
29
30
31
32
33
34
35
36
37
38
39
40
41
42
43
44
45
#!/usr/bin/env python

from z3 import *

x = []
b = []
h = [115, 29, 32, 68, 106, 108, 89, 76, 21, 71, 78, 51, 75, 1, 55, 102]
for i in xrange(16):
    x.append(BitVec('x{}'.format(i), 8))
    b.append(BitVecVal(0, 8))

# calculate missile trajectory
b[0] = x[2] ^ x[3] ^ x[4] ^ x[8] ^ x[11] ^ x[14]
b[1] = x[0] ^ x[1] ^ x[8] ^ x[11] ^ x[13] ^ x[14]
b[2] = x[0] ^ x[1] ^ x[2] ^ x[4] ^ x[5] ^ x[8] ^ x[9] ^ x[10] ^ x[13] ^ x[14] ^ x[15]
b[3] = x[5] ^ x[6] ^ x[8] ^ x[9] ^ x[10] ^ x[12] ^ x[15]
b[4] = x[1] ^ x[6] ^ x[7] ^ x[8] ^ x[12] ^ x[13] ^ x[14] ^ x[15]
b[5] = x[0] ^ x[4] ^ x[7] ^ x[8] ^ x[9] ^ x[10] ^ x[12] ^ x[13] ^ x[14] ^ x[15]
b[6] = x[1] ^ x[3] ^ x[7] ^ x[9] ^ x[10] ^ x[11] ^ x[12] ^ x[13] ^ x[15]
b[7] = x[0] ^ x[1] ^ x[2] ^ x[3] ^ x[4] ^ x[8] ^ x[10] ^ x[11] ^ x[14]
b[8] = x[1] ^ x[2] ^ x[3] ^ x[5] ^ x[9] ^ x[10] ^ x[11] ^ x[12]
b[9] = x[6] ^ x[7] ^ x[8] ^ x[10] ^ x[11] ^ x[12] ^ x[15]
b[10] = x[0] ^ x[3] ^ x[4] ^ x[7] ^ x[8] ^ x[10] ^ x[11] ^ x[12] ^ x[13] ^ x[14] ^ x[15]
b[11] = x[0] ^ x[2] ^ x[4] ^ x[6] ^ x[13]
b[12] = x[0] ^ x[3] ^ x[6] ^ x[7] ^ x[10] ^ x[12] ^ x[15]
b[13] = x[2] ^ x[3] ^ x[4] ^ x[5] ^ x[6] ^ x[7] ^ x[11] ^ x[12] ^ x[13] ^ x[14]
b[14] = x[1] ^ x[2] ^ x[3] ^ x[5] ^ x[7] ^ x[11] ^ x[13] ^ x[14] ^ x[15]
b[15] = x[1] ^ x[3] ^ x[5] ^ x[9] ^ x[10] ^ x[11] ^ x[13] ^ x[15]

s = Solver()

for i in xrange(16):
    s.add(b[i] == BitVecVal(h[i], 8))
    s.add(ULT(x[i], 0x7f))
    s.add(ULT(0, x[i]))

if s.check() == sat:
    m = s.model()
    answer = ""
    for i in x:
        answer += chr(m[i].as_long())
    # 5C0G7TY2LWI2YXMB
    print("ANSWER: {}".format(answer))
else:
    print("unsat")
Enter the launch code 5C0G7TY2LWI2YXMB and we’ll get the flag:
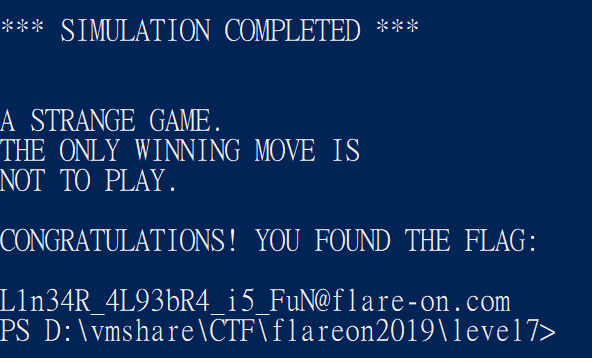
Huh? What linear algebra 🙃?
flag: L1n34R_4L93bR4_i5_FuN@flare-on.com
Level 8
Tool : FCEUX, Ghidra
Level 8 gave us a NES ROM file, which is a simple snake game. We use the arrow key to control the snake and eat the apple.
For this challenge I use FCEUX to debug the ROM. As for static analysis, since I’ve always wanted to learn how to develop a Ghidra plugin, I decided to write a iNES loader for Ghidra and use it to do the static analysis.
So I spent some time reading the NES file format (link1, link2). I also took reference from the radare2 project (link1, link2) in order to have a better knowledge of how a NES ROM is loaded into the memory. As for Ghidra plugin developing, I just follow the step in this blog post. I also learned how to write a Ghidra loader from VGKintsugi’s Ghidra SegaMasterSystem Loader.
In the end I managed to develop a Ghidra iNES ROM loader for this challenge ( it can only load the first PRG ROM though ), which is able to load the ROM into Ghidra and display the disassemble & decompiled code. You can check out the repo here.
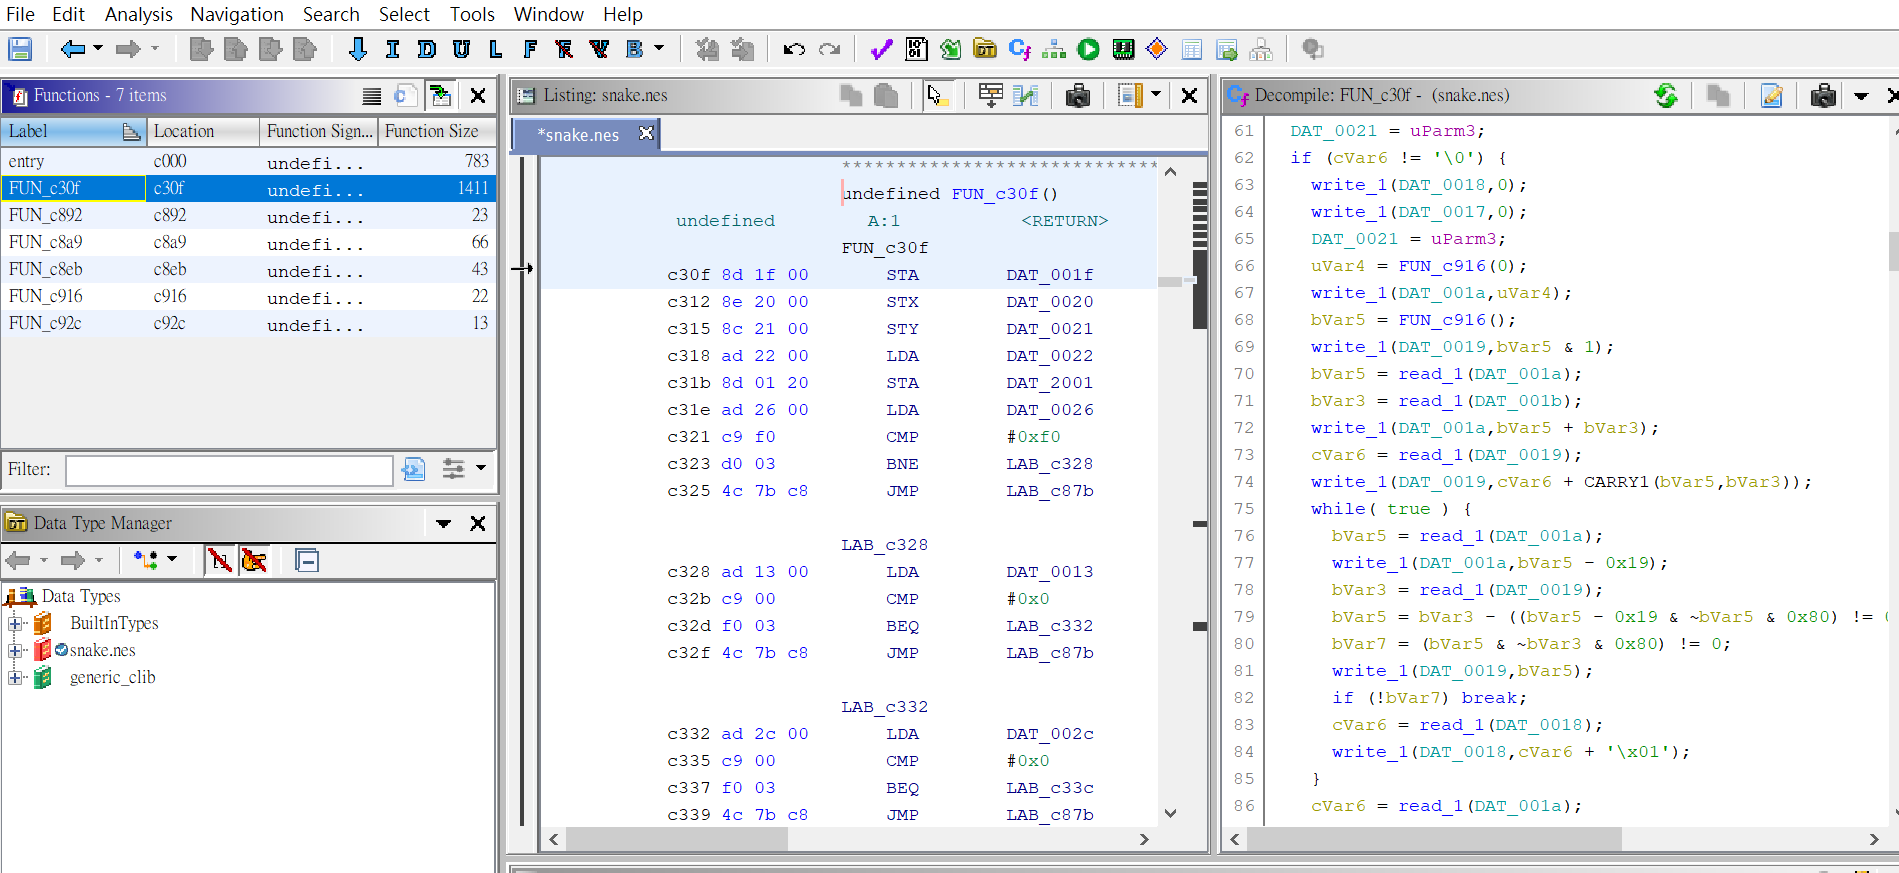
With these tools I was able to recover the game logic and identified some variable. For example, at memory address 0x4 and 0x5 it stores the snake’s direction, 0x7 and 0x8 are snake’s x-axis & y-axis, 0x17 & 0x18 are apples x-axis & y-axis…etc. I then got stuck for a while, since I’ve no idea where the flag is. Until I saw the following code:
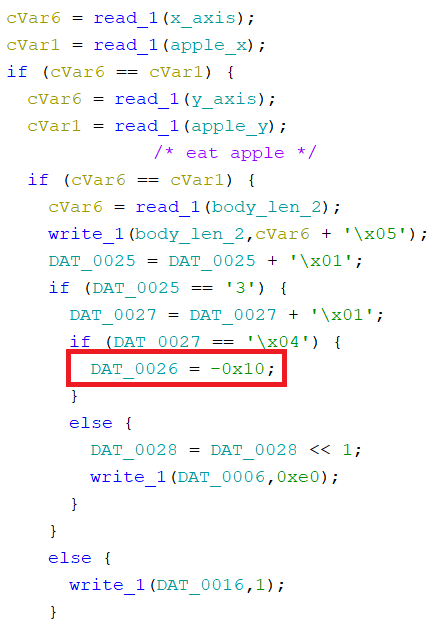
Basically it’s saying that if the snake eat 200 apples, data at address 0x26 will become 0xf0 ( it shows -0x10 in the decompiled code, but it’s actually 0xf0 ). OK, so what’s gonna happen once it becomes 0xf0? To find out the answer, I used FCEUX’s hex editor and modified the value at 0x26 to 0xf0:
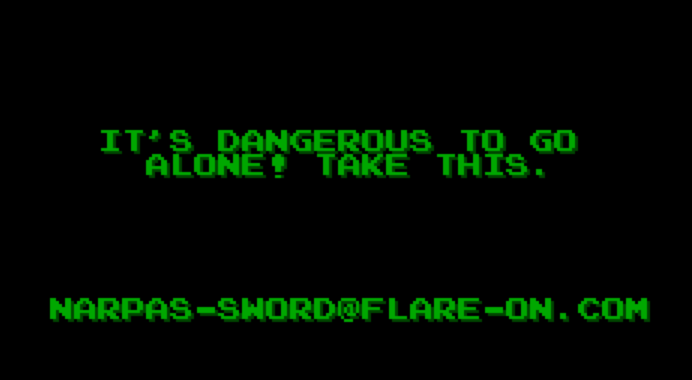
WOW 😮 That’s it ? Apparently, all we need to do is to win the game 🤨
flag:NARPAS-SWORD@flare-on.com
Level 9
Tool : IDA Pro + Windbg, x64dbg
This time is a PE32 executable ( VC++ binary ), which does simple thing: ask us to enter a key, and if the key is correct, print out the flag.
Reversed the program with IDA we’ll find out that the key checking logic seems to be a system of constraints:

However after I solve the constraints with Z3 and input the key, it kept saying that it’s the wrong key. So I started to analyze the program with debugger, and found that the program behavior is different from the one without using debugger – if I enter the key, it’ll passes the check, but print out a fake flag.
So I started tracing the program step by step, and found that before it ran to the main function, it actually jumped to a function which uses the rdtsc instruction to detect if there’s a debugger while executing the program. If so, it’ll jump to the main function ( which in this case is the fake key checking function ), otherwise it’ll execute the code that does the real key checking. The code of this function can only be spotted during the program execution, at least for me I didn’t see the code while I was reversing the binary ( I’m guessing this has something to do with the duplicate base relocation table in the .reloc section of this binary ? )
Anyway thanks to IDA & Windbg I was able to decompile the actual code of the key checking function. Apart from the code that does the anti-debug, the key checking part is actually quite simple:
- It uses SSE2 instructions to initialize a data buffer.
- Process the buffer’s data with XOR and loops.
- Read our input key ( 13 bytes ) and XORed it with the data buffer. The result must ends with “@flare-on.com”
Knowing the logic, all we need to do is write a simple script and solve the key & flag :
1
2
3
4
5
6
7
8
9
10
11
12
13
14
15
16
17
18
19
20
21
22
23
24
25
26
27
28
29
30
31
#!/usr/bin/env python
# -*- coding: utf-8 -*-

secret = "4429360a290f051b652610042b68302f00332f051a1f0f3802184202331a28042a473f042664664d10373e283e771c3f7e36342a00".decode('hex')
secret = list(secret)
for i in xrange(0x539):
    j = 0
    while j < 0x34:
        if (i%3 == 0) or (i%7==0):
            tmp = ord(secret[j]) ^ i
            secret[j] = chr(tmp&0xff)
        j += 1

secret = secret[:-1:]
sz = len(secret)
check = "@flare-on.com"
sz2 = len(check)
idx = sz-1
key = ""
for i in xrange(sz2-1, -1, -1):
    tmp = ord(check[i]) ^ ord(secret[idx])
    key = chr(tmp&0xff) + key
    idx -= 1

print("key: {}".format(key))
flag = ""
secret+="\x00"
for i in xrange(0x34):
    flag += chr((ord(key[i%13])^ord(secret[i]))&0xff)

print("flag: {}".format(flag))
Running the script will gave us the key “3HeadedMonkey” and the flag.
flag:I_mUsT_h4vE_leFt_it_iN_mY_OthEr_p4nTs?!@flare-on.com
Level 10
Tool : IDA Pro + Windbg, x64dbg
We were given several files this time:
- Mugatu.exe ( the challenge binary )
- A ransom note.
- Two
.gif.Mugatufiles, which were encrypted by the Mugatu malware.
We were asked to recover the encrypted headshot GIF ( best.gif.Mugatu ). The other file, the_key_to_success_0000.gif.Mugatu, is supposed to “help in our decryption efforts”.
After I reversed the Mugatu malware with IDA, I noticed that something isn’t right in this binary. For example, there were lots of external library call which doesn’t make any sense ( like it keep doing EncodePointer()/DecodePointer() on a NULL pointer ). Also it seems that the program is pushing incorrect amount of arguments on the stack. For example the GetCurrentProcess() function requires no argument, but the program still push a 0x1388 on the stack.
Later when I started debugging the program with x64dbg, I found out why: it seems that the IAT was wrong in the first place. The program will call a function which fixes the IAT before entering the main function. After I dumped and fixed the binary with x64dbg and its Scylla plugin, everything went back to normal 🙂
The Mugatu malware will create a thread and uses that thread to do the encryption. The code is in a DLL, which is created on the fly. At first I dumped the code with x64dbg and analyzed it with IDA, but again, I found that its external library calls were obfuscated. For instance when it wants to call a library function A, it’ll jump to the following entry:
1
2
3
push    891EA61Dh
not     [esp]
ret
~0x891EA61D will become function A’s address, so after the ret instruction the program will jump to function A and execute the code.
To de-obfuscate the code I use IDA + Windbg to do the job. After the program jump to the DllEntry, I set the IP to those library call entries and step through the program, figured out which library function will it call and mark the symbols in the idb. After that, I use the “take memory snapshot” feature in IDA, which took the memory snapshot and allows me to analyze the binary without the use of the debugger. This cause IDA created a huge idb file ( about 200 MB ), but thanks to this I was able to sort out the logic of the encryption routine:
- It will scan the drives on the computer and search if there’s a directory named “really, really, really, ridiculously good looking gifs”
- Once it find the directory, it will search for GIF file in the directory and encrypt it.
Here’s the pseudo code of the encryption:
1
2
3
4
5
6
7
8
9
10
11
12
13
14
15
16
17
18
19
20
21
22
// buf = file content
char *buf = read_file(file);

while buf != end_of_file {

    first_4 = *buf; // first 4 byte
    next_4 = buf[1]; // next 4 byte

    v5 = 0;
    for(int i = 0 ; i < 32 ; i++) {
        v6 = v5 + key[v5 & 3]; // key[v5 & 3] means the key is only 4 byte long
        v5 -= 0x61C88647;
        first_4 += v6 ^ (next_4 + ((next_4 >> 5) ^ (16 * next_4)));
        result = v5 + key[(v5 >> 11) & 3];
        next_4 += result ^ (first_4 + ((first_4 >> 5) ^ (16 * first_4)));
    }

    *buf = first_4; // write back first 4 byte
    buf[1] = next_4; // write back next 4 byte

    buf += 8;
}
Writing a decryptor is easy, however the value of key is unknown. By examining the code we’ll know that the key is only 4 bytes long, so all we need to do is crack the key with brute-forcing, then use the key to decrypt the file.
Since our goal is to decrypt a GIF file, meaning that the first 4 bytes of the decrypted data will be “GIF8” ( the header of the GIF file ). We can use this to write our key-cracker. I first cracked the key of the the_key_to_success_0000.gif.Mugatu file ( which is 4 NULL byte ), after the decryption it gave us a GIF file:

If says the first byte of the key is 0x31. We then can improve our key-cracker and speed up the cracking process. After that we’ll get the key of best.gif.Mugatu, which is 0xb1357331. Decrypt the file and we’ll get the flag:
You can check the key-cracker and the decryptor scripts here
flag: FL4rE-oN_5o_Ho7_R1gHt_NoW@flare-on.com
Level 11
Tool : IDA Pro + Windbg, x64dbg
Hey, at least its not subleq.
Oh wow, I wonder what it would be 🙄
This time it gave us a simple binary program ( vv_max.exe ) – it takes two command line arguments, and does some checking. If we passes the check, it will print out the flag.
After we reverse the binary with IDA, we can see that it’s a VM: it reads byte codes and arguments from a data buffer, then execute the corresponded functions. The VM uses lots of AVX2 instruction set, which took me some time to figure out what they’re actually doing.
After I figured out all of the functions, I wrote a disassembler and started analyzing the code. Basically it’ll take our argv1 and does some operations, then store the result ( 32 bytes ) in a buffer (buf20). It does the same thing to argv2 as well ( result will be in buf2 ). After executing the VM the program will check if buf2 and buf20 has the same data, if so, print out the flag ( which is argv2 ^ a fixed data ).
I noticed that in the end the program will check if argv1 == FLARE2019, so I just assumed that argv1 must be FLARE2019. This means that buf20 is a known value, we can extracted the data from x64dbg:
1
"\x70\x70\xB2\xAC\x01\xD2\x5E\x61\x0A\xA7\x2A\xA8\x08\x1C\x86\x1A\xE8\x45\xC8\x29\xB2\xF3\xA1\x1E\x00\x00\x00\x00\x00\x00\x00\x00"
Now all we need to do is try recover argv2 so later buf2 will have the same data. Here’s the disassemble result related to buf2:
1
2
3
4
5
6
7
8
9
10
11
12
13
14
15
16
17
18
19
20
21
22
23
# buf[1] = argv2
write_32byte_to_buf[1](data: 'aaaaaaaabbbbbbbbccccccccdddddddd')
write_32byte_to_buf[5](data: '\x00\x10\x13\x04\xbf\xbf\xb9\xb9\x00\x00\x00\x00\x00\x00\x00\x00\x00\x10\x13\x04\xbf\xbf\xb9\xb9\x00\x00\x00\x00\x00\x00\x00\x00')
write_32byte_to_buf[6](data: '////////////////////////////////')
write_32byte_to_buf[10](data: '@\x01@\x01@\x01@\x01@\x01@\x01@\x01@\x01@\x01@\x01@\x01@\x01@\x01@\x01@\x01@\x01')
write_32byte_to_buf[11](data: '\x00\x10\x01\x00\x00\x10\x01\x00\x00\x10\x01\x00\x00\x10\x01\x00\x00\x10\x01\x00\x00\x10\x01\x00\x00\x10\x01\x00\x00\x10\x01\x00')
write_32byte_to_buf[12](data: '\x02\x01\x00\x06\x05\x04\n\t\x08\x0e\r\x0c\xff\xff\xff\xff\x02\x01\x00\x06\x05\x04\n\t\x08\x0e\r\x0c\xff\xff\xff\xff')
write_32byte_to_buf[13](data: '\x00\x00\x00\x00\x01\x00\x00\x00\x02\x00\x00\x00\x04\x00\x00\x00\x05\x00\x00\x00\x06\x00\x00\x00\xff\xff\xff\xff\xff\xff\xff\xff')

Part1:
mov buf[7] <- buf[1] srld 4
mov buf[7] <- buf[7] & buf[6]
mov buf[8] <- buf[1] cmpeqb buf[6]
mov buf[8] <- buf[1] cmpeqb buf[6]
mov buf[7] <- buf[8] addb buf[7]
mov buf[7] <- buf[5] shufb buf[7]
mov buf[2] <- buf[1] addb buf[7]

Part2:
mov buf[7] <- buf[2] addubsw buf[10]
mov buf[2] <- buf[7] addwd buf[11]
mov buf[2] <- buf[2] shufb buf[12]
mov buf[2] <- buf[13] permd buf[2]
Starting from the bottom, the permd, shufb, and addwd operation can all be inversed with the help of the debugger and the reference on the internet. addubsw requires some brute-forcing, and could have multiple solutions. Here I just pick the first fitted solution. After that we’ll get a fixed value: 0x1e043a3c3226023205212e0606320102282a32290a0426171207002b3202071c
This means that after the operations in Part1, buf2 will become 0x1e043a3..... To inverse the operations in Part1, I decided to take a wild guess – I just assumed that mov buf[8] <- buf[1] cmpeqb buf[6] will make buf[8] become zero, which means none of the byte in argv2 is equals to /. This will simplify the operations to:
1
2
3
4
5
# buf[1] == argv2
Part1:
mov buf[7] <- (buf[1] srld 4) & buf[6]
mov buf[7] <- buf[5] shufb buf[7]
mov buf[2] <- buf[1] addb buf[7]
With this, we can actually crack the value of argv2 with brute-forcing. With some optimizing, we’ll get the correct value in no time. You can check my solver here.
The solver gave us two answer: cHCyrAHSXmEKpyqoCByGGuhFyCmy86E_ and cHCyrAHSXmEKpyqoCByGGuhFyCmy86Ee. Both answer will let the program print out the flag:
1
2
3
4
5
6
7
$ ./vv_max.exe FLARE2019 cHCyrAHSXmEKpyqoCByGGuhFyCmy86E_
That is correct!
Flag: AVX2_VM_M4K3S_BASE64_C0MPL1C4T3~@flare-on.com

$ ./vv_max.exe FLARE2019 cHCyrAHSXmEKpyqoCByGGuhFyCmy86Ee
That is correct!
Flag: AVX2_VM_M4K3S_BASE64_C0MPL1C4T3D@flare-on.com
We can easily figure out the correct flag, which is AVX2_VM_M4K3S_BASE64_C0MPL1C4T3D@flare-on.com. BTW I was surprised that the code in VM was just doing base64 decoding 😲:
1
2
>>> "cHCyrAHSXmEKpyqoCByGGuhFyCmy86Ee".decode('base64').encode('hex')
'7070b2ac01d25e610aa72aa8081c861ae845c829b2f3a11e'
flag: AVX2_VM_M4K3S_BASE64_C0MPL1C4T3D@flare-on.com
Level 12
Tool : IDA Pro, Windbg Preview, Volatility, binwalk, Wireshark, kpbrute
Final challenge ! This time they gave us a Windows memory crash dump and a pcap file, saying that there’s a backdoor in the system and asked us to analyze it. I’ve never analyze a Windows crash dump file before, this should be fun 😄
To analyze a crash dump, I spent some time learning the basic usage of Volatility. I’ve also spent some time to learn how to analyze a crash dump with Windbg, although this time I’ll be using Windbg Preview.
Let’s start with the crash dump first. Open the crash dump with Windbg Preview and use !analyze -v to analyze the crash, it told me that it crashed while running the man.sys module. Also it’s running a 64 bit Win 7 OS. Using volatility to analyze the process list and network connections, we’ll notice that it has some suspicious network connections at port 4444, 6666, 7777 and 8888:
1
2
3
4
5
6
7
8
9
10
11
12
13
14
$ ./volatility_2.6_win64_standalone.exe -f ./help.dmp --profile=Win7SP1x64 netscan

0x7d7c91d0         TCPv4    0.0.0.0:4444                   0.0.0.0:0            LISTENING        876      svchost.exe
................
0x7d445010         TCPv4    192.168.1.244:1588             192.168.1.243:7777   FIN_WAIT1        876      svchost.exe
0x7d62acf0         TCPv4    192.168.1.244:1586             192.168.1.243:7777   FIN_WAIT1        876      svchost.exe
0x7d6686c0         TCPv4    192.168.1.244:4444             192.168.1.243:1060   CLOSE_WAIT       876      svchost.exe
0x7d70d010         TCPv4    192.168.1.244:1633             192.168.1.243:8888   FIN_WAIT2        876      svchost.exe
............................
0x7d8e3300         TCPv4    192.168.1.244:1636             192.168.1.243:8888   FIN_WAIT2        876      svchost.exe
0x7d93b010         TCPv4    192.168.1.244:4444             192.168.1.243:1063   CLOSE_WAIT       876      svchost.exe
0x7d961010         TCPv4    192.168.1.244:1635             192.168.1.243:7777   FIN_WAIT1        876      svchost.exe
0x7d96ecf0         TCPv4    192.168.1.244:1639             192.168.1.243:6666   FIN_WAIT2        876      svchost.exe
Apparently man.sys the driver is one of the challenge binaries, let’s analyze it with the lmvm command:
1
2
3
4
5
6
7
8
9
10
11
12
13
14
kd> lmvm man
Browse full module list
start             end                 module name
fffff880`033bc000 fffff880`033cb000   man      T (no symbols)
    Loaded symbol image file: man.sys
    Image path: \??\C:\Users\FLARE ON 2019\Desktop\man.sys
    Image name: man.sys
    Browse all global symbols  functions  data
    Timestamp:        unavailable (FFFFFFFE)
    CheckSum:         missing
    ImageSize:        0000F000
    Translations:     0000.04b0 0000.04e4 0409.04b0 0409.04e4
    Information from resource tables:
Once we get the address space of the module, we can use the .writemem <filename> <start_addr> <end_addr> command to dump the binary and analyze it. After dumping the binary, I use binwalk to run a quick check on the binary file, and it said that at offset 0x7110 there’s a PE executable. After I extracted and analyzed it, I realized that this is the backdoor DLL file ( m.dll ) which is responsible for those packet data in the pcap file.
As for man.sys, I decided to open the dumped binary with IDA and start analyzing. Here are some methods I used to help me analyze the driver:
- In IDA we can load type libraries by opening the View->Type libraries window. Load some windows driver-related libraries will help us reverse the driver more conveniently.
- At first I tried to write the entire
ntdll.dllinto idb and use the Lumina server to help me identify the NT library calls. However this isn’t very effective so in the end I just check those libraries’ address in Windbg – just useuto check which library function you’re about to call:
1
2
3
4
5
6
kd> u FFFFF80002D2B0C0
nt!IoCreateDevice:
fffff800`02d2b0c0 fff3            push    rbx
fffff800`02d2b0c2 55              push    rbp
fffff800`02d2b0c3 56              push    rsi
fffff800`02d2b0c4 57              push    rdi
TIP: Later did I know that you can just use Volatility’s impscan command to identify calls to APIs. The command even has an option to generate an IDA .idc file that help us mark the function name in IDA !
- In Windbg we can use
!drvobj \Driver\in 7to analyze a driver object – it will list the location ofDriverEntry,DriverUnloadand the major dispatch function.
After analyzing the driver and m.dll, we could sort out some logic of this backdoor:
m.dllis responsible for handling the attacker’s request. It’ll wait for connection at port 4444 and receive the attacker’s request. The request will be sent toman.sysviaDeviceIoControl().man.syswill check the request and decide which DLL should it start. It then will use RC4 to decrypt the corresponded DLL file, and use APC injection to start the routine. The DLL will be encrypted once the routine is done.
The driver uses a data structure to store the DLL’s information:
1
2
3
4
5
6
7
8
9
10
11
struct dllobj{
    QWORD id; // for searching the corresponded dll
    dllobj *next; // pointer to the next dllobj
    //.... not important ......
    char *key_and_data_buf;
    QWORD routine_offset;
    QWORD data_length;
    // ... other data member;
    DWORD port_number;
    PEPROCESS process_obj; // process being injected
}
The key_and_data_buf member is kind of special. It stores the address of the encrypted DLL file ( dll_base_address ), which is also the first 8 bytes of the RC4 key. The driver will treat &key_and_data_buf as the key buffer ( 44 bytes long ) and use it to decrypt the DLL file. Once it’s decrypted, it’ll jump to dll_base_address + routine_offset to start the routine. The structure might store a DWORD as the port number at offset 0x6c, which will be used for sending the data to the attacker.
To decrypt those DLL, I decided to learn the JavaScript Debugger Scripting so I can use Javascript in Windbg to do the decryption. After reading some useful article/cheatsheet ( link1, link2 ), I came up with a script that allows me to decrypt those DLL files.
MURMUR: Gotta say… using Javascript in Windbg is not that intuitive. Like they don’t have API call
writeMemoryValuesto let us write value to memory, I have to implement a wrapper which execute theebcommand to do the job. Also I don’t like the way it execute our custom command, we have to run the command like!cmd ("<hex value>", "<hex value>"...)instead of just!cmd arg1 arg2.
Notice that since it uses APC injection to start the code, we’ll have to switch to the injected process context before we decrpyt those DLLs. So, execute the .process <address of process object> command first then run the !dr4 command, we’ll then have our decrypted routine code in the process memory. Dump the code with the .writemem command, then we can start analyzing those DLL files.
NOTE: One of the DLL (
k.dll) does not need to be decrypted though, it’s actually un-encrypted in the process memory.
After some reverse engineering we can classify those DLL with the following table:
| name | port number | routine |
|---|---|---|
| f.dll | 6666 | File processing ( read/find/delete files) |
| s.dll | 7777 | Taking screenshot ( BMP file ) |
| k.dll | 8888 | Key logger |
| c.dll | N/A | Compress data with LZNT and encrypt it with RC4 |
| n.dll | N/A | Send the data to attacker with the given port number |
Each time the attacker will choose one of the routine in f.dll/s.dll/k.dll, then the driver will pack the data with c.dll and send it to the attacker with n.dll. In c.dll it will call GetUserNameA and treat the result as the RC4 encryption key. We can retrieve the username with volatility :
1
2
3
4
5
6
7
8
9
10
11
12
13
14
15
16
$ ./volatility_2.6_win64_standalone.exe -f ./help.dmp --profile=Win7SP1x64 printkey -K "SAM\Domains\Account\Users\Names"
Volatility Foundation Volatility Framework 2.6
Legend: (S) = Stable   (V) = Volatile

----------------------------
Registry: \SystemRoot\System32\Config\SAM
Key name: Names (S)
Last updated: 2019-07-02 01:07:12 UTC+0000

Subkeys:
  (S) Administrator
  (S) FLARE ON 2019 <-- Here !
  (S) Guest

Values:
REG_DWORD                     : (S) 0
Notice that GetUserNameA will append a null byte at the end of the string, so the key is actually FLARE ON 2019\x00.
So a brief summary:
- Each time the attacker will connect to victim’s 4444 port and send a request.
m.dllwill process and forward the request to the driverman.sys.man.syswill handle the request and start doing one of the DLL’s routine inf.dll/s.dll/k.dll.- Once the routine is done, pack the response data with
c.dll. - Send the packed data to the attacker with
n.dll. The connected port number depends on which DLL was executed.
Phew ! Finally, we can start analyzing the pcap file. The plan is simple:
- Extract the packet data from port 4444/6666/7777/8888
- Decrypt and decompress those packets, and see what the attacker was doing.
Simple huh ? Except it’s not …… for some unknown reason, those encrypted packets were encrypted again with another unknown encryption method 😕 This is the moment when the challenge starting to get guessy – no matter how I tried, I just couldn’t find where the hell they got encrypted. In the end I have to guess how it got encrypted by analyzing those packet data.
EDIT: WOW, so after I read the official write-up, you actually have to use
!poolfind FLARand!object \Driverto locate another driver which uses WFP ( Windows Filtering Platform ) APIs to modify network traffic on the infected system ! 😲
Some of them are pretty simple. For those in port 4444, you can easily infer that it’s just a simple XOR operation, with a 64 bit value key. XOR those data with the key then you’ll get the raw data of the attacker’s request. For those in port 6666 and 8888, you’ll notice that it somehow send the data twice in row: one with the data encrypted, another one without being encrypted. Just extract the latter and decrypt + decompress it, you’ll get the raw data ( filename, file content, key logger data…etc. )
The packets in port 7777 are the most confusing. After hours of failing I decided to ask some help from the flare-on master @alex_k_polyakov, who told me to focus on XOR and RC4 ( which is good to know because I was starting to think it might be some AES-192 shit or something like that……. ). After analyzing those packets, I noticed that at some point it started to repeat the same 8 bytes data over and over again. With common sense, I treated the 8 bytes data as the key and XORed it with those packets. Then it just gave me the raw BMP image file…without needing to decrypt & decompress it…
Still don’t know how I got that. But as long as it works…meh
¯\_(ツ)_/¯
Now we can start analyze those data and try figure out what the attacker was trying to do. By looking at the data in port 4444, we can figure out that the attacker would constantly took screenshots of victim’s desktop, then after few moment, retrieved the key logger data. It kept doing this until it got the following screenshots:
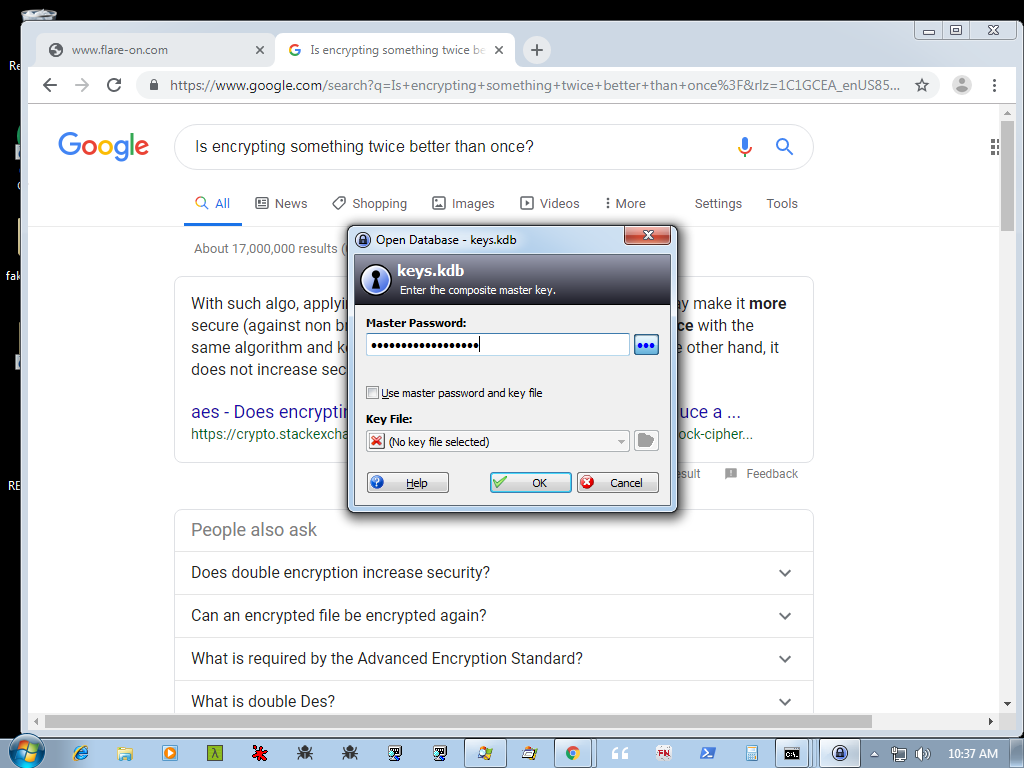
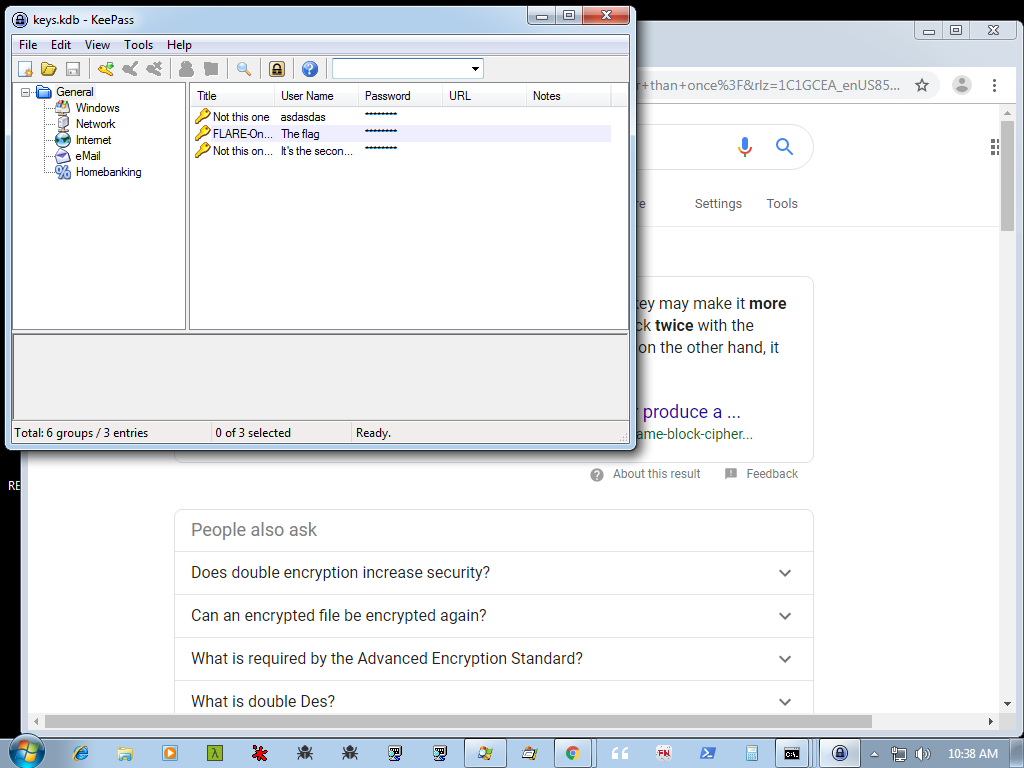
We can see that the flag in is a KeePass database (keys.kdb). After that the attacker will use port 6666 to retrieve the database.
So the direction is pretty clear: we’ll have to recover the master key of keys.kdb, load it with KeePass and get the flag. By looking at the screenshot, we’ll see that the master key is 18 bytes long. However if we look at the data from key logger, we’ll only find a 15 bytes long string, which seems to be the part of the master key:
1
th1sisth33nd111
By looking at other screenshots and data from key logger, we’ll notice something weird – for example, in the following screenshot, it shows that the victim had enter the command nslookup Fios_Quantum_Gateway.fios-router.home:
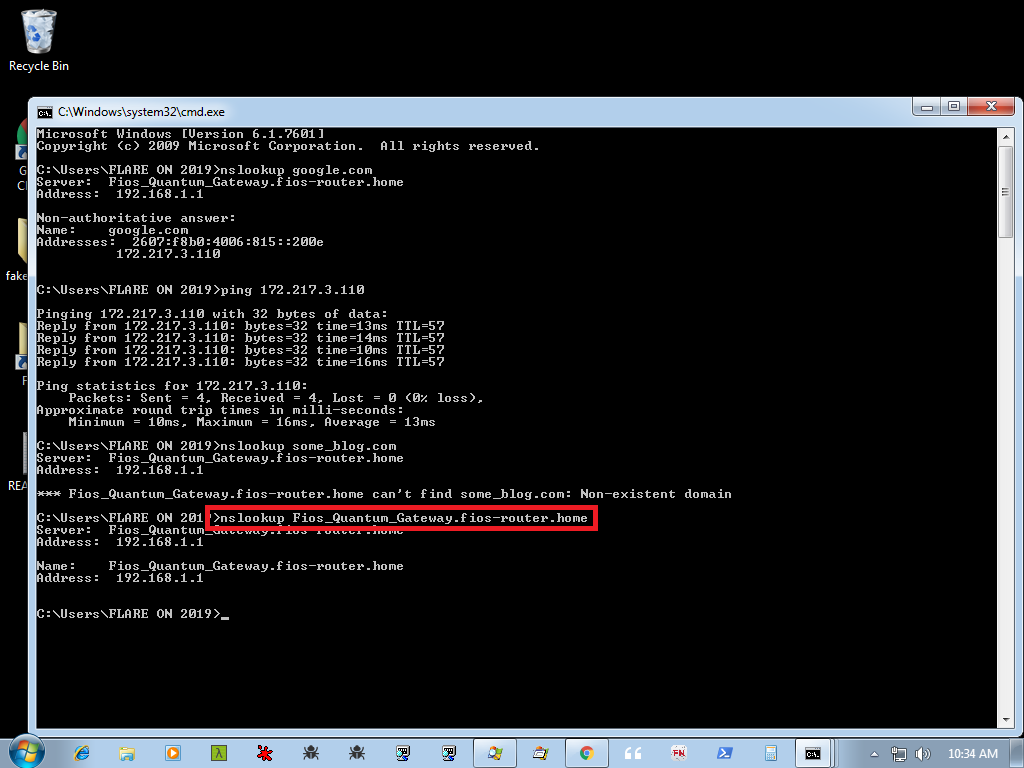
However the key logger only returned the following data:
1
nslookup fiosquatumgatefiosrouterhome
This is because the key logger only log digits and lowercase letters – it won’t log special characters like _, ., !…etc, and it’ll always convert the uppercase letters to lowercase.
So again, we’ll have to guess the pattern of the key and recover those missing/incorrect characters. By looking at the string th1sisth33nd111, we can first split the string into the following words:
- th1s
- is
- th3
- 3nd111
Here I was just taking wild guesses. I assumed that the missing characters are _, which means the key should be something like:
1
th1s_is_th3_3nd111 <-- now 18 characters
Also it doesn’t make sense to append a string 111 at the end of the key string. After looking at my keyboard, I realized it’s probably !!! instead of 111, since the key logger will still return 1 even the shift key is pressed. Now we got:
1
th1s_is_th3_3nd!!!
The key seems legit, but it’s still not the correct master key, since we’ll have to brute-force the letter case of each letter. Here I’m using kpbrute to help me do the job – just generate a dictionary file with a simple script and kpbrute will handle the rest. At first it failed to crack the correct master key. After I replaced th1s with th!s, it finally gave me the correct master key:
1
Th!s_iS_th3_3Nd!!!
Load the database with KeePass and enter the master key, we finally get the damn flag of the final challenge of FLARE-On 6:
f0ll0w_th3_br34dcrumbs@flare-on.com
HELL. THE F*CK. YEAH ! 🎉🎉🎉
Epilogue
Great challenge as always. In fact I feel I had way more fun than the previous one. I think it’s because I get to learn lot more stuff than last year – Android app analysis, Frida, Ghidra plugin developing, stuff about NES, anti-debug techniques, Windows crash dump analysis…… and lot, lot more ! Flarebear and snake were my favorites, bmphide, wopr and Mugatu were also pretty cool. It’s kind of suck that help ( level 12 ) requires some guessing while cracking the master key, otherwise it’s also a pretty nice challenge. It gave me a chance to learn how to analyze a Windows crash and write Javascript with Windbg, how to use Volatility, and lots of IDA tricks/tips while doing reverse engineering 🙂
Kudos to the FLARE team for creating those amazing challenges, and CTFd for hosting the CTF ( It’s nice that we’re able to check our rank during the CTF ! ). Also a big thank to @alex_k_polyakov for helping me out on level 12 ! Finally, congratz to all the participants who was able to finish the challenge this year, especially the other 7 Taiwanese !
See you next year ! 😁