Flare-on Challenge 2018 Write-up
Flare-on challenge is a Reverse-style CTF challenge created by the FireEye FLARE team. The CTF contains lots of interesting, real-world style reversing challenges ( e.g. de-obfucating binary, malware analysis, …etc). This year is the fifth annual of the CTF and has a total of 12 challenges, covering Windows PE (.NET, VC++, Delphi…), Linux ELF, Web Assembly, VM and other interesting stuffs.
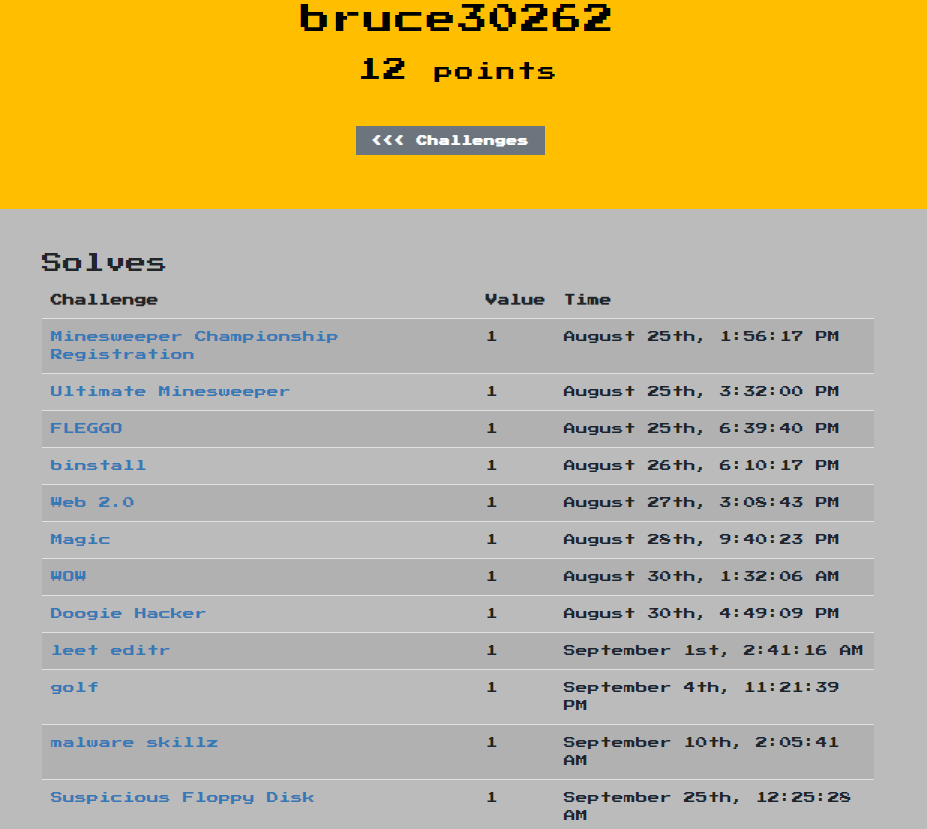
According to the final result on flare-on.com, 129 out of 4925 players have finished the challenge this year.
Last year I got stuck at level 12 and failed to finish the challenge, so I’m very glad that I was able to complete it this year 😄. Here in this post I’ll share my solution of each challenge – how I solve it, what tools did I use, …etc. You can also checkout the official solutions from FireEye.
Enough for the talk, let’s get started !
Level 1
Welcome to the Fifth Annual Flare-On Challenge! The Minesweeper World Championship is coming soon and we found the registration app. You weren’t officially invited but if you can figure out what the code is you can probably get in anyway. Good luck!
Tool : jd-gui
We were given a jar file. According to the description we have to reverse it and figure out the correct invitation code.
Since it’s the first challenge it’s quite easy : just use jd-gui to decompile the jar file, then we’ll see the correct code, which is also the flag:

flag: GoldenTicket2018@flare-on.com
Level 2
You hacked your way into the Minesweeper Championship, good job. Now its time to compete. Here is the Ultimate Minesweeper binary. Beat it, win the championship, and we’ll move you on to greater challenges.
Tool : dnSpy
This time we’re given a .NET binary program, which is a minesweeper game.
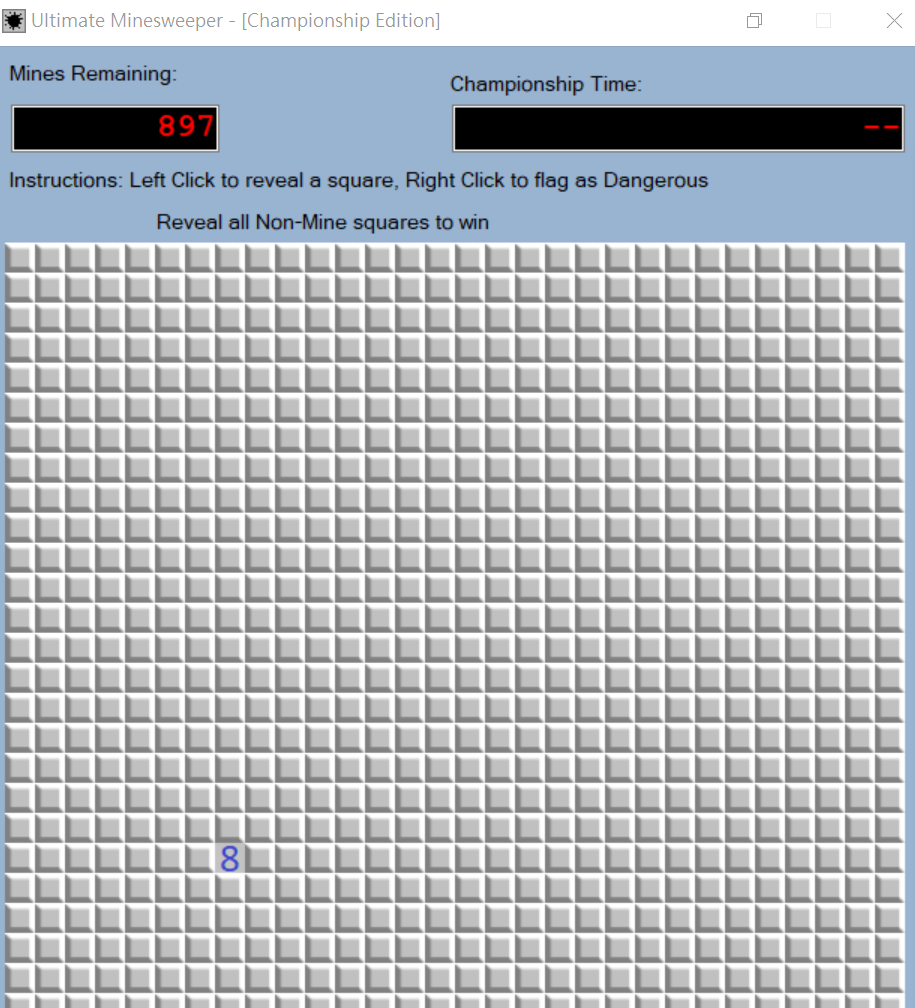
The board is 30x30, and there’re 897 mines in the board. We’ll have to reveal all three None-Mine squares to win the game.
I decompiled the binary with dnSpy and started inspecting the program logic. Later I’ve found an interesting function:
1
2
3
4
5
6
7
8
9
this.RevealedCells.Add(row * MainForm.VALLOC_NODE_LIMIT + column);
if (this.MineField.TotalUnrevealedEmptySquares == 0)
{
    this.stopwatch.Stop();
    Application.DoEvents();
    Thread.Sleep(1000);
    new SuccessPopup(this.GetKey(this.RevealedCells)).ShowDialog();
    Application.Exit();
}
Looks like it’ll call a GetKey function once we beat the game. Let’s dig into it:
1
2
3
4
5
6
7
8
9
10
11
12
13
14
15
16
17
18
19
20
21
22
23
24
25
26
27
28
29
30
31
32
33
34
35
36
37
38
39
40
41
42
43
44
45
46
47
48
49
50
51
private string GetKey(List<uint> revealedCells)
{
    revealedCells.Sort();
    Random random = new Random(Convert.ToInt32(revealedCells[0] << 20 | revealedCells[1] << 10 | revealedCells[2]));
    byte[] array = new byte[32];
    byte[] array2 = new byte[]
    {
        245,
        75,
        65,
        142,
        68,
        71,
        100,
        185,
        74,
        127,
        62,
        130,
        231,
        129,
        254,
        243,
        28,
        58,
        103,
        179,
        60,
        91,
        195,
        215,
        102,
        145,
        154,
        27,
        57,
        231,
        241,
        86
    };
    random.NextBytes(array);
    uint num = 0u;
    while ((ulong)num < (ulong)((long)array2.Length))
    {
        byte[] array3 = array2;
        uint num2 = num;
        array3[(int)num2] = (array3[(int)num2] ^ array[(int)num]);
        num += 1u;
    }
    return Encoding.ASCII.GetString(array2);
}
Looks like the return string of this function will be the flag of this challenge.
Here revealedCells is a list which stores the cells that doesn’t contain mines. In order to get the flag, we’ll have to get the position of these three cells.
By using dnSpy, we can dump the board from the memory and write some python script to extract those cells. Here are their positions (row, col):
1
2
3
1. [20, 7]
2. [24, 28]
3. [7, 28]
At first I tried to click those cells, only to find that the height of the board has exceeded my screen, making me unable to click cell [24, 28]… 🤨
Anyway we can still use the “set next statement” feature in dnSpy to hijack the program flow. Here I let the program jump to the line
1
this.RevealedCells.Add(row * MainForm.VALLOC_NODE_LIMIT + column);
directly and modify the row & col variable ( by pressing F2 in dnSpy ) to those None-Mine cells’ position. Then I jump to the GetKey function to get the flag:
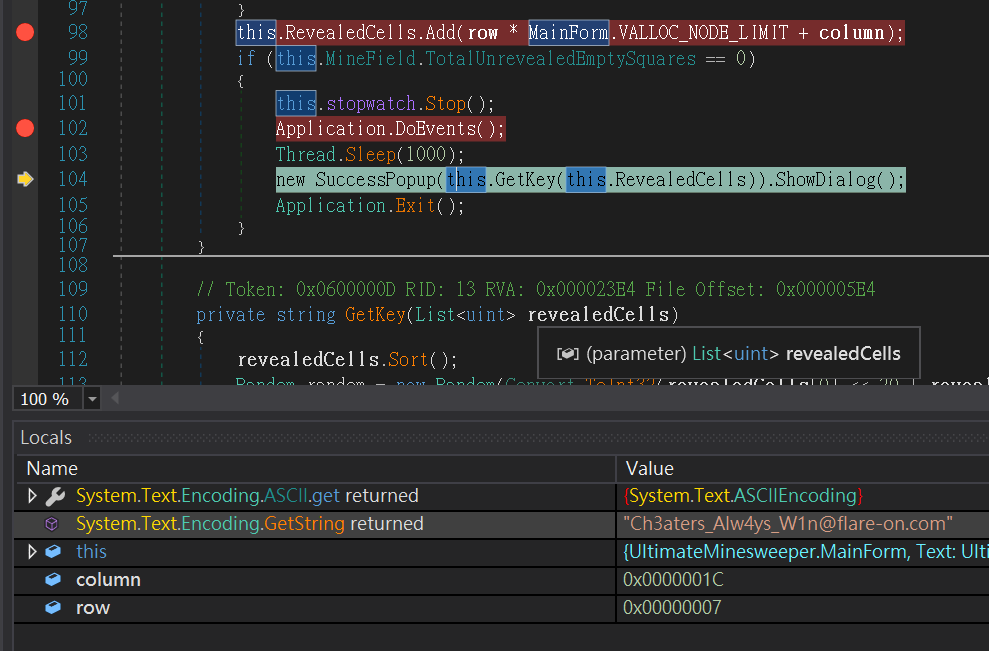
flag: Ch3aters_Alw4ys_W1n@flare-on.com
Level 3
When you are finished with your media interviews and talk show appearances after that crushing victory at the Minesweeper Championship, I have another task for you. Nothing too serious, as you’ll see, this one is child’s play
Tools : IDA Pro, CFF Explorer, x64dbg, LIEF
This time a bunch of PE files were given, all of them have the same program logic : Ask for a password, and do something if the password is correct, or else it just quit:
1
2
3
4
PS D:\vmshare\flareon2018\level3>.\AEVYfSTJwubrlJKgxV8RAl0AdZJ5vhhy.exe
What is the password?
123123
Go step on a brick!
After we reverse the binary we can see that the password is actually read from the resource section of the PE file:
1
2
3
4
5
6
7
8
9
10
11
12
13
14
15
16
17
18
19
LPVOID sub_401000()
{
  HRSRC v0; // eax
  HRSRC v1; // edi
  HGLOBAL v3; // eax
  LPVOID v4; // esi

  v0 = FindResourceW(0, (LPCWSTR)101, L"BRICK");
  v1 = v0;
  if ( !v0 )
    return 0;
  v3 = LoadResource(0, v0);
  if ( !v3 )
    return 0;
  v4 = LockResource(v3);
  if ( SizeofResource(0, v1) != 33104 )
    v4 = 0;
  return v4;
}
By using x64dbg and CFF Explorer we can confirm that the password is at the begining of the BRICK:id_101 resource data:


So in order to pass the challenge we’ll have to find a way to extract all the passwords from those PE files. Here I’m using LIEF to help me extract the password from the PE resource section:
1
2
3
4
5
6
7
8
9
10
11
12
13
14
15
16
17
18
19
20
21
22
23
24
25
26
27
28
29
30
#!/usr/bin/env python
# -*- coding: utf-8 -*-

import os
import lief

def get_code(filename):
    binary = lief.parse(filename)
    brick = binary.resources.childs.next()
    id_101 = brick.childs.next()
    data = id_101.childs.next().content

    code = ""
    has_zero = False
    for d in data:
        if d == 0:
            if has_zero == True:
                break
            else:
                has_zero = True
        else:
            has_zero = False
            code += chr(d)
    print("{} => {}".format(filename, code))

for _, _, files in os.walk("."):
    for f in files:
        if f.endswith(".exe"):
            get_code(f)
output :
1
2
3
4
5
1BpnGjHOT7h5vvZsV4vISSb60Xj3pX5G.exe => ZImIT7DyCMOeF6
1JpPaUMynR9GflWbxfYvZviqiCB59RcI.exe => PylRCpDK
2AljFfLleprkThTHuVvg63I7OgjG2LQT.exe => UvCG4jaaIc4315
3Jh0ELkck1MuRvzr8PLIpBNUGlspmGnu.exe => uVmH96JGdPkEBfd
.......
Then we can write some python script to run those binaries with the extracted password:
1
2
3
4
5
6
7
8
9
10
11
12
13
14
15
16
17
18
19
20
21
22
23
24
25
26
27
28
29
30
31
32
33
34
35
36
37
38
39
40
41
42
43
44
45
46
47
48
49
50
51
52
53
54
55
56
57
58
59
60
61
62
63
64
from subprocess import Popen, PIPE, STDOUT
import os

passcode = dict()
passcode["1BpnGjHOT7h5vvZsV4vISSb60Xj3pX5G.exe"] = "ZImIT7DyCMOeF6"
passcode["1JpPaUMynR9GflWbxfYvZviqiCB59RcI.exe"] = "PylRCpDK"
passcode["2AljFfLleprkThTHuVvg63I7OgjG2LQT.exe"] = "UvCG4jaaIc4315"
passcode["3Jh0ELkck1MuRvzr8PLIpBNUGlspmGnu.exe"] = "uVmH96JGdPkEBfd"
passcode["4ihY3RWK4WYqI4XOXLtAH6XV5lkoIdgv.exe"] = "3nEiXqMnXG"
passcode["7mCysSKfiHJ4WqH2T8ERLE33Wrbp6Mqe.exe"] = "Q9WdIAGjUKdNxr6"
passcode["AEVYfSTJwubrlJKgxV8RAl0AdZJ5vhhy.exe"] = "UkuAJxmt8"
passcode["aSfSVMn7B8eRtxgJgwPP5Y5HiDEidvKg.exe"] = "b1VRfMTNPu"
passcode["azcyERV8HUbXmqPTEq5JFt7Ax1W5K4wl.exe"] = "qNb6tr7n"
passcode["BG3IDbHOUt9yHumPceLTVbObBHFneYEu.exe"] = "KSL8EAnlIZin1gG"
passcode["Bl0Iv5lT6wkpVCuy7jtcva7qka8WtLYY.exe"] = "uLKEIRAEn"
passcode["bmYBZTBJlaFNbbwpiOiiQVdzimx8QVTI.exe"] = "7kcuVMWeIBFGWfJ"
passcode["Bp7836noYu71VAWc27sUdfaGwieALfc2.exe"] = "NcMkqwelbRu"
passcode["cWvFLbliUfJl7KFDUYF1ABBFYFb6FJMz.exe"] = "yu7hNshnpM4Vy"
passcode["d4NlRo5umkvWhZ2FmEG32rXBNeSSLt2Q.exe"] = "5xj9HmHyhF"
passcode["dnAciAGVdlovQFSJmNiPOdHjkM3Ji18o.exe"] = "ZYNGeumv6QuI7"
passcode["dT4Xze8paLOG7srCdGLsbLE1s6m3EsfX.exe"] = "dRnTVwZPjf0U"
passcode["E36RGTbCE4LDtyLi97l9lSFoR7xVMKGN.exe"] = "dPVLAQ8LwmhH"
passcode["eEJhUoNbuc40kLHRo8GB7bwFPkuhgaVN.exe"] = "J1kj42jZsC9"
passcode["eovBHrlDb809jf08yaAcSzcX4T37F1NI.exe"] = "rXZE7pDx3"
passcode["Ew93SSPDbgiQYo4E4035A16MJUxXegDW.exe"] = "eoneTNuryZ3eF"
passcode["gFZw7lPUlbOXBvHRc31HJI5PKwy745Wv.exe"] = "jZAorSlICuQa0g8"
passcode["hajfdokqjogmoWfpyp4w0feoeyhs1QLo.exe"] = "hqpNm7VJL"
passcode["HDHugJBqTJqKKVtqi3sfR4BTq6P5XLZY.exe"] = "45psrewIRS"
passcode["iJO15JsCa1bV5anXnZ9dTC9iWbEDmdtf.exe"] = "2LUmPSYdxDcil"
passcode["IXITujCLucnD4P3YrXOud5gC7Bwcw6mr.exe"] = "aGUwVeVZ2c19mgE"
passcode["JIdE7SESzC1aS58Wwe5j3i6XbpkCa3S6.exe"] = "goTZP4go"
passcode["jJHgJjbyeWTTyQqISuJMpEGgE1aFs5ZB.exe"] = "9aIZjTerf0"
passcode["JXADoHafRHDyHmcTUjEBOvqq95spU7sj.exe"] = "jZRmFmeIchneGS"
passcode["K7HjR3Hf10SGG7rgke9WrRfxqhaGixS0.exe"] = "Z8VCO7XbKUk"
passcode["kGQY35HJ7gvXzDJLWe8mabs3oKpwCo6L.exe"] = "14bm9pHvbufOA"
passcode["lk0SOpnVIzTcC1Dcou9R7prKAC3laX0k.exe"] = "9eDMpbMSEeZ"
passcode["MrA1JmEDfPhnTi5MNMhqVS8aaTKdxbMe.exe"] = "auDB6HtMv"
passcode["NaobGsJ2w6qqblcIsj4QYNIBQhg3gmTR.exe"] = "C446Zdun"
passcode["P2PxxSJpnquBQ3xCvLoYj4pD3iyQcaKj.exe"] = "nLSGJ2BdwC"
passcode["PvlqINbYjAY1E4WFfc2N6rZ2nKVhNZTP.exe"] = "0d7qdvEhYGc"
passcode["SDIADRKhATsagJ3K8WwaNcQ52708TyRo.exe"] = "5O2godXTZePdWZd"
passcode["SeDdxvPJFHCr7uoQMjwmdRBAYEelHBZB.exe"] = "ohj5W6Goli"
passcode["u3PL12jk5jCZKiVm0omvh46yK7NDfZLT.exe"] = "4z0gAyKdk"
passcode["u8mbI3GZ8WtwruEiFkIl0UKxJS917407.exe"] = "r6ZWNWeFadW"
passcode["v6RkHsLya4wTAh71C65hMXBsTc1ZhGZT.exe"] = "dEDDxJaxc1R"
passcode["w3Y5YeglxqIWstp1PLbFoHvrQ9rN3F3x.exe"] = "HQG0By9q"
passcode["wmkeAU8MdYrC9tEUMHH2tRMgaGdiFnga.exe"] = "0rhvT5GX"
passcode["x4neMBrqkYIQxDuXpwJNQZOlfyfA0eXs.exe"] = "Fs3Ogu6W3qk59kZ"
passcode["xatgydl5cadiWFY4EXMRuoQr22ZIRC1Y.exe"] = "8V9AzigUcb2J"
passcode["xyjJcvGAgswB7Yno5e9qLF4i13L1iGoT.exe"] = "gNbeYAjn"
passcode["y77GmQGdwVL7Fc9mMdiLJMgFQ8rgeSrl.exe"] = "8Etmc0DAF8Qv"
passcode["zRx3bsMfOwG8IaayOeS8rHSSpiRfc9IB.exe"] = "XgkvZJKe"

def run_binary(filename):
    code = passcode[filename]
    print("{} => {}".format(filename, code))
    p = Popen([filename,], stdout=PIPE, stdin=PIPE, stderr=STDOUT)
    output = p.communicate(input=code)[0]
    print("output: {}".format(output))

for _, _, files in os.walk("."):
    for f in files:
        if f.endswith(".exe"):
            run_binary(f)
For some unknown reason I couldn’t install LIEF on Windows 10, so I had to seperate the script into two different scripts : one for extracting the passwords ( run under a Linux VM ), another for running the binaries ( run under Win10 )
After that those binaries will generate 48 png files, and output something like:
1
67782682.png => m
Take a look at 67782682.png:
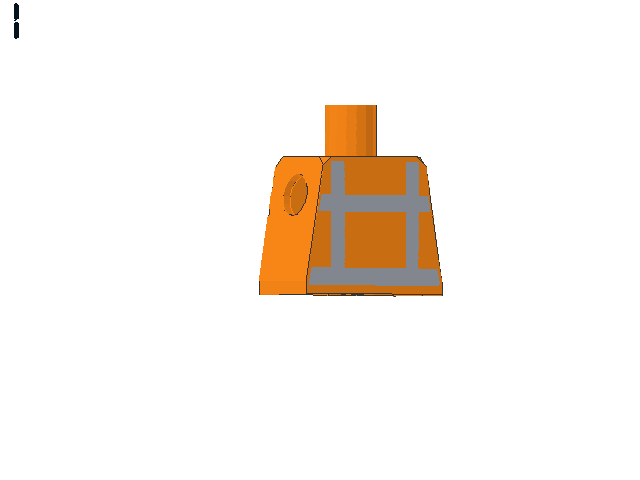
The number at the top-left side of the picture indicates the n-th character of the flag. So according to the sample above we can know that the first character of the flag is “m”.
Since the filename of those png files are totally random, I decided to rename those files into something like 01_67782682.png manually and wrote another python script to extract the flag ( sounds stupid, but I was too lazy to think of a better way :P )
flag: mor3_awes0m3_th4n_an_awes0me_p0ssum@flare-on.com
Level 4
It is time to get serious. Reverse Engineering isn’t about toys and games. Sometimes its about malicious software. I recommend you run this next challenge in a VM or someone else’s computer you have gained access to, especially if they are a Firefox user.
Tools : dnSpy, Process Monitor, IDA Pro + Windbg, dll_to_exe, FireFox & Chrome browser
I like this one a lot, learned tons of stuff while solving it :)
This time we were given a .NET binary ( binstall.exe ). By using dnSpy we can see that it’s obfuscated with lots of none-printable unicode characters:
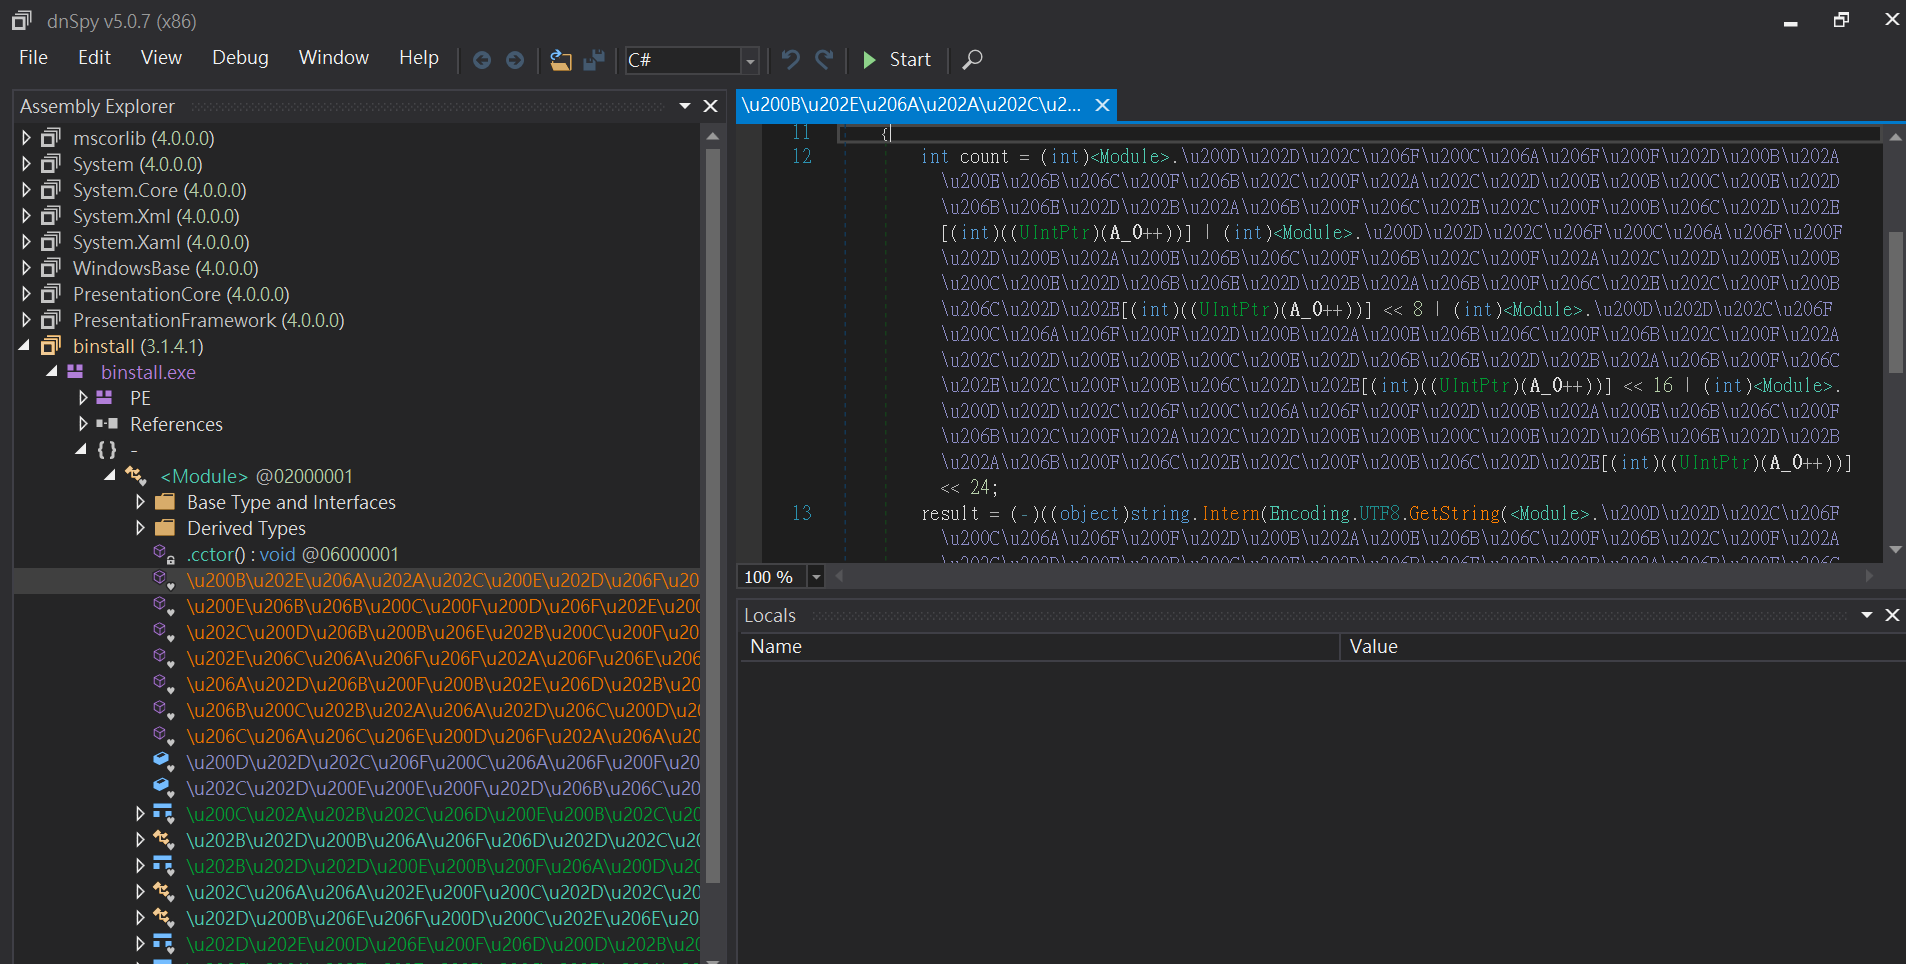
However by using Process Monitor and dnSpy’s debugger, we can still figured out the program logic :
- It wrote a file
browserassist.dllintoC:\Users\<User>\AppData\Roaming\Microsoft\Internet Explorer\browserassist.dll - It set the registries so each time a Microsoft Windows-based application is launch it will load the
browserassist.dll.
I then started analyzing the dll file with IDA Pro. Here I also use hasherezade’s dll_to_exe to help me run and debug the dll directly. With the help of IDA Pro and its debugger, we can sort out the program logic of browserassist.dll :
- It first check if the filename of the main process is
firefox.exe( version must < 55 ) - It then will download the content of
https://pastebin.com/raw/hvaru8NU, and decrpyt it with RC4. The content after the decryption can be seen here. It’s basically a json file that indicates the position and the content of the injected malicious js code. - At last it will use DLL injection to hook the
PR_Read&PR_Writefunction innspr4.dll&nss3.dll(which both are loaded by Firefox)
From the json file we know that the dll will only inject the malicious js code if we’re browsing the website with the host name *.flare-on.com. By viewing the source of flare-on.com we can assure that this is our target, since it contains files like /js/view.js.
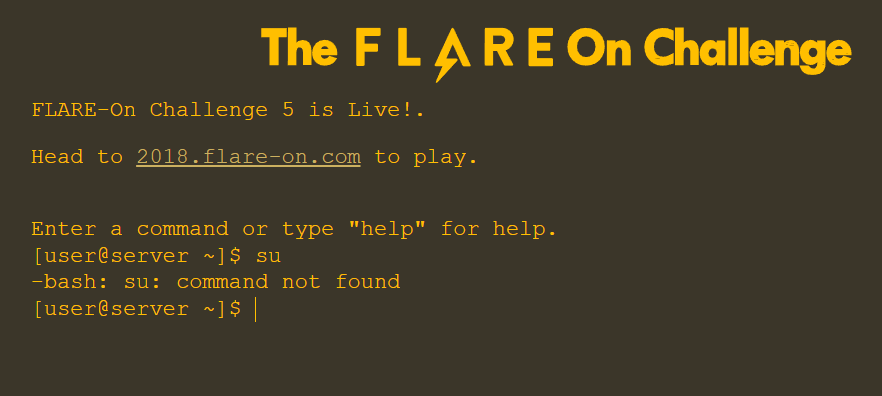
By checking the website with Firefox 54 and other browser, we’ll notice some differences. For example the malicious code had added a su command inside the web page:
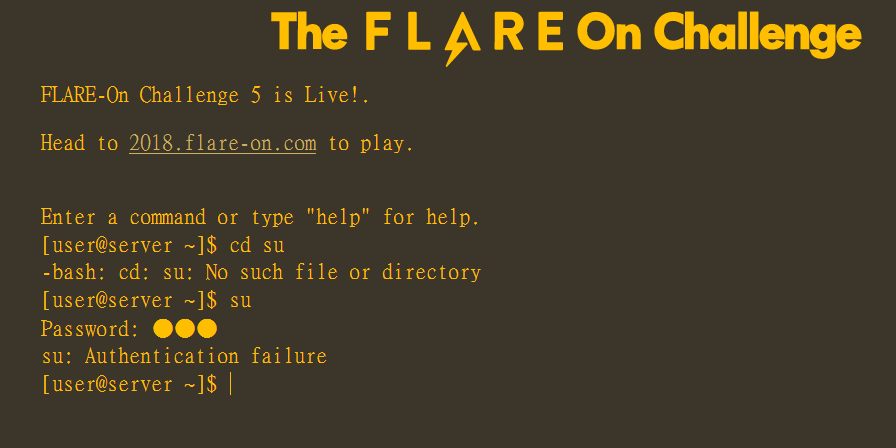
If you’re using other browser it’ll show that su is an invalid command:
So now we’ll have to figured out the root’s password. Here the password checking logic is also obfuscated:
1
2
3
4
5
6
7
8
9
10
11
12
13
14
15
16
17
18
19
20
function cp(p) {
    if (model.passwordEntered = !1, 10 === p.length && 123 == (16 ^ p.charCodeAt(0)) && p.charCodeAt(1) << 2 == 228 && p.charCodeAt(2) + 44 === 142 && p.charCodeAt(3) >> 3 == 14 && p.charCodeAt(4) === parseInt(function () {
      var h = Array.prototype.slice.call(arguments),
      k = h.shift();
      return h.reverse().map(function (m, W) {
        return String.fromCharCode(m - k - 24 - W)
      }).join('')
    }(50, 124) + 4.toString(36).toLowerCase(), 31) && p.charCodeAt(5) - 109 == - 22 && 64 == (p.charCodeAt(3) << 4 & 255) && 5 * p.charCodeAt(6) === parseInt(function () {
      var n = Array.prototype.slice.call(arguments),
      M = n.shift();
      return n.reverse().map(function (r, U) {
        return String.fromCharCode(r - M - 16 - U)
      }).join('')
    }(22, 107) + 9.toString(36).toLowerCase(), 19) && p.charCodeAt(7) + 14 === 'xyz'.charCodeAt(1) && 3 * (6 * (p.charCodeAt(8) - 50) + 14) == 17 + parseInt(function () {
      var l = Array.prototype.slice.call(arguments),
      f = l.shift();
      return l.reverse().map(function (O, o) {
        return String.fromCharCode(O - f - 30 - o)
      }).join('')
    }(14, 93) + 6.toString(36).toLowerCase(), 8) - 1 + 12 && 3 + (p.charCodeAt(9) + 88 - 1) / 2 === p.charCodeAt(0)) model.root = 1,
Here I modified the code into the following format so I can use the Chrome debugger to figure out the password checking logic:
1
2
3
4
5
6
7
8
9
10
11
12
13
14
15
16
17
18
19
20
21
22
23
24
25
26
27
28
29
30
31
32
33
34
35
36
37
38
39
40
function cp(p) {
    // store the value into a variable so we can check the value from debugger
    var p4 = parseInt(function () {
      var h = Array.prototype.slice.call(arguments),
      k = h.shift();
      return h.reverse().map(function (m, W) {
        return String.fromCharCode(m - k - 24 - W)
      }).join('')
    }(50, 124) + "4", 31);

    var p6 = parseInt(function () {
      var n = Array.prototype.slice.call(arguments),
      M = n.shift();
      return n.reverse().map(function (r, U) {
        return String.fromCharCode(r - M - 16 - U)
      }).join('')
    }(22, 107) + "9", 19);

    var p8 = parseInt(function () {
      var l = Array.prototype.slice.call(arguments),
      f = l.shift();
      return l.reverse().map(function (O, o) {
        return String.fromCharCode(O - f - 30 - o)
      }).join('')
    }(14, 93) + "6", 8) - 1 + 12;

    // password checking logic start from here
    if (10 === p.length &&
    123 == (16 ^ p.charCodeAt(0)) &&
    p.charCodeAt(1) << 2 == 228 &&
    p.charCodeAt(2) + 44 === 142 &&
    p.charCodeAt(3) >> 3 == 14 &&
    p.charCodeAt(4) === p4 &&
    p.charCodeAt(5) - 109 == - 22 &&
    64 == (p.charCodeAt(3) << 4 & 255) &&
    5 * p.charCodeAt(6) === p6 &&
    p.charCodeAt(7) + 14 === 'xyz'.charCodeAt(1) &&
    3 * (6 * (p.charCodeAt(8) - 50) + 14) == 17 + p8 &&
    3 + (p.charCodeAt(9) + 88 - 1) / 2 === p.charCodeAt(0)    ) alert("ok");
  }
After that we can figure out the root password is : k9btBW7k2y, and login as the root user.
At last, we’ll have to figure out the secret directory to get the flag ( see the comment below ):
1
2
3
4
5
6
7
8
9
10
11
12
13
14
15
16
17
18
19
20
21
22
23
24
25
26
27
28
29
30
31
32
33
34
35
36
37
38
39
40
41
42
43
44
45
46
47
48
49
50
51
52
53
54
55
56
57
58
59
60
61
62
63
64
65
66
67
68
69
70
71
72
73
74
75
// weird shit
function de(instr) {
    for (var zzzzz, z = model.password, zz = atob(instr), zzz = [
    ], zzzz = 0, zzzzzz = '', zzzzzzz = 0; zzzzzzz < parseInt('CG', 20); zzzzzzz++) zzz[zzzzzzz] = zzzzzzz;
    for (zzzzzzz = 0; zzzzzzz < parseInt('8O', 29); zzzzzzz++) zzzz = (zzzz + zzz[zzzzzzz] + z.charCodeAt(zzzzzzz % z.length)) % parseInt('8G', 30),
    zzzzz = zzz[zzzzzzz],
    zzz[zzzzzzz] = zzz[zzzz],
    zzz[zzzz] = zzzzz;
    for (var y = zzzz = zzzzzzz = 0; y < zz.length; y++) zzzz = (zzzz + zzz[zzzzzzz = (zzzzzzz + 1) % parseInt('514', 7)]) % parseInt('213', 11),
    zzzzz = zzz[zzzzzzz],
    zzz[zzzzzzz] = zzz[zzzz],
    zzz[zzzz] = zzzzz,
    zzzzzz += String.fromCharCode(zz.charCodeAt(y) ^ zzz[(zzz[zzzzzzz] + zzz[zzzz]) % parseInt('D9', 19)]);
    return zzzzzz
}
// the ls command
function lsDir() {
    var d = model.curDir;
    if (d === '~')
    view.printOut('home_list');
// if we're in the secret direcotry, print the weird shit
     else if (d === (27).toString(36).toLowerCase().split('').map(function (A) {
      return String.fromCharCode(A.charCodeAt() + ( - 39))
    }).join('') + (function () {
      var E = Array.prototype.slice.call(arguments),
      O = E.shift();
      return E.reverse().map(function (s, j) {
        return String.fromCharCode(s - O - 52 - j)
      }).join('')
    }) (7, 160) + (34).toString(36).toLowerCase()) {
      $('#cmd-window').append(de((function () {
        var A = Array.prototype.slice.call(arguments),
        f = A.shift();
        return A.reverse().map(function (E, v) {
          return String.fromCharCode(E - f - 22 - v)
        }).join('')
      }) (1, 89, 97, 142, 140, 107, 157, 88, 124, 107, 150, 142, 134, 145, 110, 125, 98, 148, 98, 136, 126) + (23).toString(36).toLowerCase().split('').map(function (S) {
        return String.fromCharCode(S.charCodeAt() + ( - 39))
      }).join('') + (16201).toString(36).toLowerCase() + (1286).toString(36).toLowerCase().split('').map(function (v) {
        return String.fromCharCode(v.charCodeAt() + ( - 39))
      }).join('') + (10).toString(36).toLowerCase().split('').map(function (p) {
        return String.fromCharCode(p.charCodeAt() + ( - 13))
      }).join('') + (function () {
        var V = Array.prototype.slice.call(arguments),
        P = V.shift();
        return V.reverse().map(function (i, f) {
          return String.fromCharCode(i - P - 11 - f)
        }).join('')
      }) (59, 171, 202, 183, 197, 149, 166, 148, 129, 184, 145, 176, 149, 174, 183) + (2151800446).toString(36).toLowerCase() + (515).toString(36).toLowerCase().split('').map(function (Z) {
        return String.fromCharCode(Z.charCodeAt() + ( - 13))
      }).join('') + (30).toString(36).toLowerCase().split('').map(function (G) {
        return String.fromCharCode(G.charCodeAt() + ( - 39))
      }).join('') + (24).toString(36).toLowerCase() + (28).toString(36).toLowerCase().split('').map(function (W) {
        return String.fromCharCode(W.charCodeAt() + ( - 39))
      }).join('') + (3).toString(36).toLowerCase() + (1209).toString(36).toLowerCase().split('').map(function (u) {
        return String.fromCharCode(u.charCodeAt() + ( - 39))
      }).join('') + (13).toString(36).toLowerCase().split('').map(function (U) {
        return String.fromCharCode(U.charCodeAt() + ( - 13))
      }).join('') + (652).toString(36).toLowerCase() + (16).toString(36).toLowerCase().split('').map(function (l) {
        return String.fromCharCode(l.charCodeAt() + ( - 13))
      }).join('') + (function () {
        var D = Array.prototype.slice.call(arguments),
        R = D.shift();
        return D.reverse().map(function (L, H) {
          return String.fromCharCode(L - R - 50 - H)
        }).join('')
      }) (36, 159, 216, 151, 203, 175, 206, 210, 138, 180, 195, 136, 166, 155)));
      view.addCmd();
    }
    else if (d.includes('/')) {
      view.printOut(d.replace(/\//g, '-').toLowerCase() + '_list');
    }
    else
    view.printOut(d.toLowerCase() + '_list');
  }
To get what the secret directory is, we just have to paste the code to the chrome console:
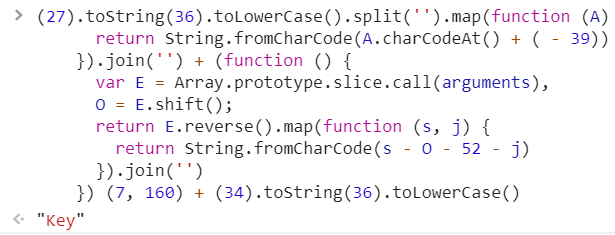
“Key”
So we cd to the Key directory and enter the ls command:
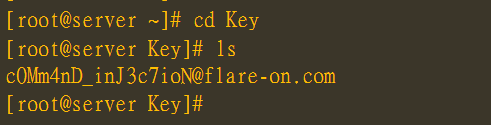
Bingo ! The flag is : c0Mm4nD_inJ3c7ioN@flare-on.com
Level 5
The future of the internet is here, again. This next challenge will showcase some the exciting new technologies paving the information super-highway for the next generation.
Tools : wabt, FireFox & Chrome browser
This time a wasm file and a simple webpage were given. By checking the main logic in main.js:
1
2
3
4
5
6
7
8
9
10
11
12
13
14
15
16
17
18
    let a = new Uint8Array([ 0xE4, 0x47, 0x30, 0x10, 0x61, 0x24, 0x52, 0x21, 0x86, 0x40, 0xAD, 0xC1, 0xA0, 0xB4, 0x50, 0x22, 0xD0, 0x75, 0x32, 0x48, 0x24, 0x86, 0xE3, 0x48, 0xA1, 0x85, 0x36, 0x6D, 0xCC, 0x33, 0x7B, 0x6E, 0x93, 0x7F, 0x73, 0x61, 0xA0, 0xF6, 0x86, 0xEA, 0x55, 0x48, 0x2A, 0xB3, 0xFF, 0x6F, 0x91, 0x90, 0xA1, 0x93, 0x70, 0x7A, 0x06, 0x2A, 0x6A, 0x66, 0x64, 0xCA, 0x94, 0x20, 0x4C, 0x10, 0x61, 0x53, 0x77, 0x72, 0x42, 0xE9, 0x8C, 0x30, 0x2D, 0xF3, 0x6F, 0x6F, 0xB1, 0x91, 0x65, 0x24, 0x0A, 0x14, 0x21, 0x42, 0xA3, 0xEF, 0x6F, 0x55, 0x97, 0xD6 ]);

    let b = new Uint8Array(new TextEncoder().encode(getParameterByName("q")));

    let pa = wasm_alloc(instance, 0x200);
    wasm_write(instance, pa, a);

    let pb = wasm_alloc(instance, 0x200);
    wasm_write(instance, pb, b);

// flag checking logic
    if (instance.exports.Match(pa, a.byteLength, pb, b.byteLength) == 1) {
        // PARTY POPPER
        document.getElementById("container").innerText = "🎉";
    } else {
        // PILE OF POO
        document.getElementById("container").innerText = "💩";
    }
We could know that inside the wasm file there must be a Match function which does the flag checking. The result must be 1, or else it’ll failed the check and show you a pile of poop 💩 lol
In order to learn about the flag checking logic, I use wabt to decompiled the wasm file into C code. After that there’s nothing much to say, the strategy is simple : you read the C code, figured out the logic, then wrote a script to resolve the flag.
The flag checking logic can be implemented as the following python code :
1
2
3
4
5
6
7
8
9
10
11
12
13
14
15
16
17
18
19
20
21
22
23
24
25
26
27
28
29
30
31
32
33
34
35
36
37
38
39
40
41
42
43
44
45
46
47
48
49
50
51
52
53
54
55
56
57
58
59
60
61
62
63
64
65
66
67
68
69
70
71
72
73
74
75
76
77
78
79
80
81
82
83
84
85
86
87
88
89
90
91
92
93
94
95
96
buf1 = [0xE4, 0x47, 0x30, 0x10, 0x61, 0x24, 0x52, 0x21, 0x86, 0x40, 0xAD, 0xC1, 0xA0, 0xB4, 0x50, 0x22, 0xD0, 0x75, 0x32, 0x48, 0x24, 0x86, 0xE3, 0x48, 0xA1, 0x85, 0x36, 0x6D, 0xCC, 0x33, 0x7B, 0x6E, 0x93, 0x7F, 0x73, 0x61, 0xA0, 0xF6, 0x86, 0xEA, 0x55, 0x48, 0x2A, 0xB3, 0xFF, 0x6F, 0x91, 0x90, 0xA1, 0x93, 0x70, 0x7A, 0x06, 0x2A, 0x6A, 0x66, 0x64, 0xCA, 0x94, 0x20, 0x4C, 0x10, 0x61, 0x53, 0x77, 0x72, 0x42, 0xE9, 0x8C, 0x30, 0x2D, 0xF3, 0x6F, 0x6F, 0xB1, 0x91, 0x65, 0x24, 0x0A, 0x14, 0x21, 0x42, 0xA3, 0xEF, 0x6F, 0x55, 0x97, 0xD6]
bp15 = 0
bp8 = 0

def f2(idx1):
    global bp15, bp8, buf1
    left = len(buf1) - idx1
    if 2 > left: return 105 # must >= 2 or else it'll OOB
    if (buf1[idx1] & 15) != 0: return 112 # ftbl index check

    bp15 = buf1[idx1+1] & 255
    bp8 = 2
    return 0

def f3(idx1):
    global bp15, bp8, buf1
    left = len(buf1) - idx1
    if 2 > left: return 105 # must >= 2 or else it'll OOB
    if (buf1[idx1] & 15) != 1: return 112 # ftbl index check

    bp15 = buf1[idx1+1] ^ 0xffffffff
    bp8 = 2
    return 0

def f4(idx1):
    global bp15, bp8, buf1
    left = len(buf1) - idx1
    if 3 > left: return 105 # must >= 3 or else it'll OOB
    if (buf1[idx1] & 15) != 2: return 112 # ftbl index check

    bp15 = buf1[idx1+1] ^ buf1[idx1+2]
    bp8 = 3
    return 0

def f5(idx1):
    global bp15, bp8, buf1
    left = len(buf1) - idx1
    if 3 > left: return 105 # must >= 3 or else it'll OOB
    if (buf1[idx1] & 15) != 3: return 112 # ftbl index check

    bp15 = buf1[idx1+1] & buf1[idx1+2]
    bp8 = 3
    return 0

def f6(idx1):
    global bp15, bp8, buf1
    left = len(buf1) - idx1
    if 3 > left: return 105 # left must >= 3 or else it'll OOB
    if (buf1[idx1] & 15) != 4: return 112 # ftbl index check

    bp15 = buf1[idx1+1] | buf1[idx1+2]
    bp8 = 3
    return 0

def f7(idx1):
    global bp15, bp8, buf1
    left = len(buf1) - idx1
    if 3 > left: return 105 # left must >= 3 or else it'll OOB
    if (buf1[idx1] & 15) != 5: return 112 # ftbl index check

    bp15 = buf1[idx1+1] + buf1[idx1+2]
    bp8 = 3
    return 0

def f8(idx1):
    global bp15, bp8, buf1
    left = len(buf1) - idx1
    if 3 > left: return 105 # left must >= 3 or else it'll OOB
    if (buf1[idx1] & 15) != 6: return 112 # ftbl index check

    bp15 = buf1[idx1+2] - buf1[idx1+1]
    bp8 = 3
    return 0

ftbl = [f2, f3, f4, f5, f6, f7, f8]

def f9(buf2):
    global buf1, bp15, bp8
    len2 = len(buf2)
    idx1, idx2 = 0, 0
    while idx2 < len2:
        func_idx = buf1[idx1] & 15 # least 4 bits
        assert func_idx < 7, 'Invalid func idx: {}'.format(func_idx)

        ret = ftbl[func_idx](idx1)
        assert ret == 0, 'ret != detected in func{}'.format(func_idx+2)

        tmp1 = (buf2[idx2] << 24) >> 24
        tmp2 = bp15 & 255
        assert tmp1 == tmp2, "Failed tmp cmp: {} != {}".format(tmp1, tmp2)

        idx1 += bp8
        idx2 += 1

    # If the script run to this line that means buf2 is the correct flag
    print(buf2)
After that we can use the following script to resolve the flag:
1
2
3
4
5
6
7
8
9
10
11
12
13
14
15
16
17
18
def solve():
    flag = ""
    global buf1, bp15, bp8
    len1 = len(buf1)
    idx1 = 0
    while idx1 < len1:
        func_idx = buf1[idx1] & 15 # least 4 bits
        assert func_idx < 7, 'Invalid func idx: {}'.format(func_idx)

        ret = ftbl[func_idx](idx1)
        assert ret == 0, 'ret != detected in func{}'.format(func_idx+2)

        tmp2 = bp15 & 255
        flag += chr(tmp2)

        idx1 += bp8

    print(flag)
flag: wasm_rulez_js_droolz@flare-on.com
Level 6
Wow you are a really good reverse engineer! Keep it up! You can do it!
How to tell if your child is a computer hacker:
- They are using Lunix, an illegal hacker operating system
- Are they struggling to maintain contact with the outside world, due to spending their time reading gibberish on the computer screen
Tools : IDA Pro, capstone & unicorn, pwntools, gdb
This one was such a disaster… I spent so much time doing useless thing in this one and felt like an idiot after I found the solution…
Anyway in this challenge we were given an ELF binary ( YAY ! ), and the program looks like this:
1
2
3
4
Welcome to the ever changing magic mushroom!
666 trials lie ahead of you!
Challenge 1/666. Enter key: 123
No soup for you!
So apparently we’ll have to input the correct key for 666 rounds to get the flag. After we reverse the binary with IDA Pro, we can sort out some program logic. Basically once we input a key:
- The program will decrypt a code buffer ( using
xor). - Part of our key will be checked with the decrypted code.
- If it passes the check, the program will re-encrpyt the code buffer, or else it’ll exit the program.
- Repeat the above steps for 33 times.
- If we pass all 33 stages, enter the next round.
Also start from address 0x605100 there’s an array, which its element has the following data structure:
1
2
3
4
5
6
7
8
9
10
struct data
{
    char *code_buf; // address of the encrpyted code buffer
    DWORD code_len; // length of the code
    DWORD key_offset; // indicate the position of the key string
    DWORD int_arr_len; // length of int_arr
    DWORD copy_offset; // not important
    char *xor_key; // key to decrypt the code buffer
    QWORD int_arr[32]; // might also be char arr[288]
}
We can see that the data structure contains the informations of each round’s code decrpytion & key checking function.
Each time we pass a round, the program will overwrite these data structures with the new one ( to ensure every key in each round is different ). Notice that this also affect the binary itself, since it will write those change back to the disk.
Anyway we can dump the data structure by writing a IDAPython script:
1
2
3
4
5
6
7
8
9
10
11
12
13
14
15
16
17
18
19
20
21
22
23
24
25
26
27
28
29
30
31
32
33
34
35
36
37
38
39
40
41
42
43
44
45
46
47
48
49
50
51
52
53
54
55
56
57
58
59
60
61
init_addr = 0x605100

class Data:
    def __init__(self, addr):
        self.parse(addr)

    def parse(self, addr):
        self.code_buf = Qword(addr)
        self.code_len = Dword(addr+8)
        self.key_off = Dword(addr+12)
        self.int_arr_len = Dword(addr+16)
        self.copy_off = Dword(addr+20)
        self.xor_key = Qword(addr+24)
        self.int_arr = []
        for i in xrange(32):
            read_addr = addr + 32 + i*8
            self.int_arr.append(Qword(read_addr))
        self.code = None

    def print_data(self):
        print("code buf: {:#x}".format(self.code_buf))
        print("code len: {:#x}".format(self.code_len))
        print("xor key: {:#x}".format(self.xor_key))
        print("key off: {:#x}".format(self.key_off))
        print("copy off: {:#x}".format(self.copy_off))
        print("int_arr_len: {:#x}".format(self.int_arr_len))
        print("int_arr:")
        for idx, i in enumerate(self.int_arr):
            print("{}. {:#x}".format(idx, i))
        print("code:")
        print(map(hex, self.code))
        print("")

datas = []
for i in xrange(33):
    cur_addr = init_addr + 0x120*i
    data = Data(cur_addr)
    datas.append(data)

def read_buf(addr, sz):
    ret = []
    for i in xrange(sz):
        ret.append(Byte(addr+i))
    return ret

def xor_code(data):
    code = read_buf(data.code_buf, data.code_len)
    key = read_buf(data.xor_key, data.code_len)
    ret = []
    for a, b in zip(code, key):
        ret.append(a^b)
    return ret

for d in datas:
    d.code = xor_code(d)

import pickle
with open("dump", "w") as f:
    pickle.dump(datas, f)

print("Done")
I’ve also decrypted the code buffer and save it for later usage.
At first I was too lazy to figured out each funtion’s logic. Since we have the machine code I tried to brute-force the key by using the unicorn engine. Later did I found that the emulation speed was too slow, guess we still have to look into those functions.
So I use pwntools’ make_elf function to convert those machine code into ELF binaries, then use IDA Pro to decompile the binary so I can study the function’s logic.
Although we have to go through 33 functions in each round, there’re only 7 different functions. Each of them will take a part of our input key and do some checking. If it passes the check it’ll return 1, otherwise it’ll return 0.
I then spent tons of hours re-implementing those 7 functions with python and tried to solve the key with brute-force. However the result was not good: it’s still too slow ! It took about a minute to solve just one key, which means it’ll take about ~10 hours to solve all 666 keys.
At that moment I decided to study those functions more carefully, start from function 0:
1
2
3
4
5
6
7
8
9
10
11
12
13
14
15
16
17
18
19
20
21
22
23
24
25
26
27
28
29
30
31
32
33
34
35
36
37
38
int func0 (char *key, unsigned int int_arr_len, __int64 *int_arr)
{
    for ( i = 0; i < int_arr_len; ++i )
    {
        if ( int_arr[i] )
        {
            v11 = key[i];
            v6 = 0LL;
            v5 = 1LL;
            v4 = 0LL;
            while ( v11 )
            {
                v6 = v5 + v4;
                v4 = v5;
                v5 = v6;
                --v11;
            }
            if ( v6 != int_arr[i] )
                return 0LL;
        }
        else
        {
            v10 = key[i];
            v9 = 0LL;
            v8 = 1LL;
            v7 = 0LL;
            while ( v10 )
            {
                v9 = v8 + v7;
                v7 = v8;
                v8 = v9;
                --v10;
            }
            int_arr[i] = v9;
        }
    }
    return 1LL;
}
🤔…this looks very similar to fibonacci ….
Wait a second … It IS fibonacci !! OMG I’m such an idiot 😫
☝ Yeah…that’s me after N hours of frustrations…
And after that I quickly figured out the rest of the functions:
- func0 : Fibonacci
- func1 : CRC32
- func2 : RC4
- func3 : Base64 encoding with customized table
- func4 ~ fun6 : Simple
xor/suboperation
With these informations I quickly wrote a python script with the corresponded decrypt functions and solve the challenge in just 5 minutes …
(-‸ლ)
Lesson learned:
- Stop using brute-force. Try understand what a function does and recognize the algorithm.
- Don’t be lazy. Sometimes the solution is so simple, and yet people are still too lazy to get it.
flag: mag!iC_mUshr00ms_maY_h4ve_g!ven_uS_Santa_ClaUs@flare-on.com
Level 7
Wow, just…. Wow.
Tools : IDA Pro + Windbg
Have to solve it statically cause this one kept crashing in my Windows VM :/
A PE32 file called WorldOfWarcraft.exe was given. After we reverse the binary we know that the program:
- Check if it’s on Windows 7 and has WoW64 on the system
- Decrypt an embeded 64 bit dll file using xor
- Switch to x64 mode ( by modifying the
csregister with theretfinstruction) and execute the dll file.
We can dump the 64 bit dll with IDAPython. Unfortunately by the time I solve this challenge dll_to_exe has not support the 64 bit dll yet, so in order to debug the dll I had to write a simple ( ugly ) C code for this one :
1
2
3
4
5
6
7
8
9
10
11
12
13
14
15
16
17
18
int main()
{
    HMODULE hm = LoadLibrary("7.dll");
    if(!hm)
    {
        printf("load failed...\n");
        printf("%d\n", GetLastError());
    }
    else
    {
        printf("%p\n", hm);
        addr = (long long int)(hm) + 0x1180;
        printf("%p\n", addr);
        getchar();
        addr(0,0,0);
    }
    return 0;
}
Here it will load the 64 bit dll ( 7.dll ) and wait for our input. We then can attach the debugger to this process and press any key to continue the debug process.
EDIT: dll_to_exe finally support 64 bit dll ! However it won’t work on this one, you’ll have to use PE-bear to convert the dll to exe ( check out this hasherezade’s blog post for more details )
By reverse & debug the dll file with IDA Pro, we could sort out some stuff in this dll file :
- There’s another 32 bit dll file in the binary.
- There’s a flag-related function inside the 64 bit dll.
I first reversed the 32 bit dll, and found an important function which does the following :
1
2
3
4
5
6
7
8
9
10
11
12
13
14
15
16
17
18
19
20
21
22
23
24
cnt = 0;
v0 = WSAStartup(514, Dst);
v16 = v0;
if ( !v0 )
{
  v7 = socket(2, 1, 6);
  if ( v7 != -1 )
  {
    port = 0;
    while ( cnt < 29 )
    {
      printf("\n?: ");
      scanf("%d", &port);
      LOWORD(port_) = 2;
      v3 = inet_addr("127.0.0.1");
      HIWORD(port_) = htons((unsigned __int16)port);
      v16 = connect(v7, &port_, 16);
      ++cnt;
    }
    recv(v7, &flag_buf, 29, 0);
    sprintf(&Dest, "%s@flare-on.com\n", &flag_buf);
    printf(&Dest);
  }
}
Looks like it’ll try connect to 127.0.0.1 with different ports for 29 times. After that it will receive the flag from server and print it out.
So now the question is, where’s the server ? It’s the flag-related function inside the 64 bit dll:
1
2
3
4
5
6
7
8
9
10
11
12
13
14
15
16
17
18
19
20
21
22
23
24
25
26
27
28
29
30
31
32
33
34
35
36
37
38
39
40
switch ( v12 ) // v12 = IoControlCode
{
  case 0x12003: // AFD_BIND
    // do stuff
    break;
  case 0x12007: // AFD_CONNECT
    v8 = *(unsigned int *)(v6 + 32);
    qmemcpy(&v3, (const void *)(v8 + 14), 2ui64);
    if ( (unsigned int)key_idx <= 0x74ui64 )
    {
      if ( v4 == key[key_idx] )
      {
        for ( i = key_idx + 1; i < 29; ++i )
          key[i] ^= v4;
      }
      flag[key_idx] ^= LOBYTE(key[key_idx]);
      ++key_idx;
      *(_QWORD *)v10 = 0xC0000005i64;
      v9 = 0xC0000005i64;
    }
    else
    {
      *(_QWORD *)v10 = 5i64;
      v9 = 0xC0000005i64;
    }
    break;
  case 0x12017: // AFD_RECV
    *(_QWORD *)&v7 = *(unsigned int *)(v6 + 32);
    v5 = *(unsigned int *)v7;
    qmemcpy((void *)*(unsigned int *)(v5 + 4), flag, *(unsigned int *)v5); // send flag
    *(_DWORD *)v10 = 0;
    *(_DWORD *)(v10 + 4) = *(_DWORD *)v5;
    break;
  case 0x12047: // IO_AFD_SET_CONTEXT
    // do stuff
    break;
  case 0x1207B: // IO_AFD_GET_INFO
    // do stuff
    break;
}
There’s a switch case inside the function, which base on the value of IoControlCode. Here I skip the code that isn’t relate to the flag and focus on AFD_CONNECT and AFD_RECV.
We can see that in AFD_CONNECT it does some xor operation between two data buffer. In AFD_RECV it will copy one of the data buffer to… whatever the destination is. When I saw this I realized that this correspond to the code in the 32 bit dll ( connect 29 times then receive flag ). So all we need to do is write a simeple IDAPython script to get the flag:
1
2
3
4
5
6
7
8
9
10
11
12
13
14
15
16
addr1 = 0x000000180006B40
addr2 = 0x000000180006BB8

key, flag = [], []

for i in xrange(29):
    key.append(Dword(addr1 + i*4))
    flag.append(Byte(addr2 + i))

for idx1 in xrange(29):
    v4 = key[idx1]
    for idx2 in xrange(idx1+1, 29):
        key[idx2] ^= v4
    flag[idx1] ^= v4&0xff

print "flag:", ''.join(chr(c) for c in flag)
flag: P0rt_Kn0ck1ng_0n_he4v3ns_d00r@flare-on.com
Level 8
You are absolutely crushing this. Saved off the first few sectors from a hard drive that some computer genius had back in the 90s. People say the kid used to write his own computer software but that sounds crazy. This little prankster left us a secret message I think.
Tools : qemu, IDA Pro, gdb
This time we were given an x86 bootloader. Interesting :)
For static analysis we just need to open the binary with IDA Pro and rebase the image to 0x7E00. As for dynamic analysis I’m using qemu, which can run the boot code with the following command :
1
qemu-system-i386 -hda ./doogie.bin ( -s -S for gdbserver, port:1234 )
Here’s what it looks like after we run the binary :
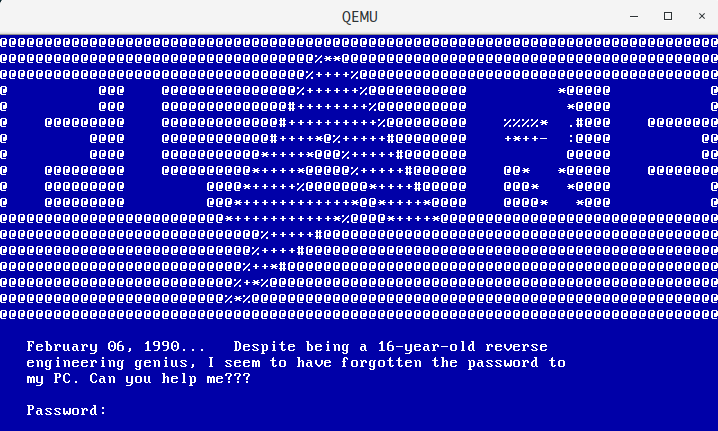
So apparently we have to figure out the correct password. By reading those 16 bit assembly we can quickly figure out the program logic :
1
2
3
4
5
6
7
8
9
10
11
12
13
14
15
16
17
18
19
20
21
/* pseudo code */

char g_8809[] = "......"; // some crap

void xor_data_with_g_8809(char *buf, int sz)
{
    for(i = 0 ; i < strlen(g_8809) ; i++)
    {
        g_8809[i] ^= buf[i % sz];
    }
}

main()
{
    clean_screen();
    set_date(date_buf); // store the date information in date_buf
    xor_data_with_g_8809(date_buf, 4) // xor date_buf with data buffer @ 0x8809
    read_n(buf, 20) // read at most 20 bytes
    xor_data_with_g_8809(buf, strlen(buf)) // xor input buffer with data buffer @ 0x8809
    print(g_8809) // print out the content of 0x8809
}
The program will first get the date information with the int 0x1a interrupt, rotate it and store the data into date_buf. For example if the date is 2018-08-30, the date_buf will become "\x20\x18\x08\x30". The picture above shows that the date is 1990-02-06, so the date_buf should be \x19\x90\x02\x06.
After that is simple, it takes date_buf and our input buffer and xor with the data at address 0x8809 (g_8809). The program will then print out the content of g_8809, and hlt the program.
So I re-implemented the program logic with python, and print out the content of g_8809 before xoring our input buffer. And then I found there’s some pattern inside the buffer: it contains some string like OPERATE, MALWARE, ON…, moreover they were kind of concatenated.
Based on frequency analysis, I then tried operateonmalware as password, and xor it with g_8809. Then I found there’s lots of '8' and space character in the buffer. By the time I’m guessing that the result of g_8809 will contain lots of '8' and space, forming a flag-like ascii art.
I then noticed that there was a Q right beside 8, so I tried make it become 8 by xoring with i, which make the password became ioperateonmalware. And fortunately, it’s the correct password :)
flag: R3_PhD@flare-on.com
Level 9
Its getting to the very late stage challenges now, so its probably a good point to just turn back, stop this insanity. What’s that? You wanted more ASCII art? Ask and ye shall receive.
Tools : IDA Pro + Windbg, Chrome browser
Special thanks to Lays for helping me on this one
We were given a leet_editr.exe, which is a PE32 executable (GUI) Intel 80386, for MS Windows. After reverse it with IDA Pro we know that:
- It will copy the encrpyted code & data into the newly allocated buffer. However the memory buffer will all be marked as
PAGE_NOACCESS, so it will trigger the access violation error once it try to execute the code in the buffer. - It has an exception handler, which will catch the access violation error and decrypt the encrypted code & data inside the memory buffer, then marked the memory as
r-x/r--. This make the program able to decrypt & execute the encrypted code. - There are some functions which are used for communicating / dispatching function with the COM object. Will elaborate on that later.
At first I tried to get the decrypted code with the help of the debugger, but those exceptions made it almost impossible to do so. Then I decided to ignore those encrypted code/data and tried to reverse the other part of the binary.
And then I got stuck :(
After asking Lays for help, he told me that the encrypted code/data contain some important message, which means I’ll have to decrypt those data anyway ( manually ). Oh well :/
So after some static analysis I found that the program uses the following data structures to record the informations of the decryption phase:
1
2
3
4
5
6
7
8
9
10
11
12
13
14
15
16
17
18
19
20
21
22
23
24
struct enc_data
{
  DWORD type; // decryption type
  DWORD f4; // no use
  DWORD sz; // enc buffer size
  char **enc_buf; // enc buffer
  DWORD dec_info_total; // number of the decrypt info
  dec_info (*dec_info)[]; // decrypt info
  DWORD f18; // no use
  key_info *key_info; // decrypt key info
  char *new_buf; // newly allocated buffer
};

struct dec_info
{
  DWORD dec_start; // start position of the decryption
  DWORD dec_len; // decrypt length
};

struct key_info
{
  DWORD key_len; // key length
  char *key; // key buffer
};
Basically it will use enc_data->type to determine the decryption type ( e.g. xor, RC4…etc ). Then it will use dec_info to get the start position and the length of the decryption. After that it will use the data in key_info to decrypt the buffer.
Here I decrypted and dumped the encrypted code & data with IDAPython:
1
2
3
4
5
6
7
8
9
10
11
12
13
14
15
16
17
18
19
20
21
22
23
24
25
26
27
28
29
30
31
32
33
34
35
36
37
38
39
40
41
42
43
44
45
46
47
48
49
50
51
52
53
54
55
56
57
58
59
60
61
62
63
64
65
66
67
68
69
70
71
72
73
74
75
76
77
78
79
80
81
82
83
84
85
86
87
88
89
90
91
92
93
94
95
96
97
98
99
100
101
102
103
104
105
106
107
108
109
110
111
112
113
114
115
116
117
118
119
120
121
122
123
124
125
126
127
128
129
130
131
132
133
134
135
136
137
138
139
140
141
142
143
144
145
146
147
148
149
150
151
152
153
154
155
156
157
158
159
160
161
162
163
164
165
"""
struct enc_data
{
  DWORD type;
  DWORD f4;
  DWORD sz;
  char **enc_buf;
  DWORD dec_info_total;
  dec_info (*dec_info)[];
  DWORD f18;
  key_info *key_info;
  char *new_buf;
};

"""
import ctypes

def rc4(sz, buf, K):
    """ RC4 """
    # https://github.com/bozhu/RC4-Python
    def KSA(key):
        keylength = len(key)
        S = range(256)
        j = 0
        for i in range(256):
            j = (j + S[i] + key[i % keylength]) % 256
            S[i], S[j] = S[j], S[i]  # swap
        return S
    def PRGA(S):
        i = 0
        j = 0
        while True:
            i = (i + 1) % 256
            j = (j + S[i]) % 256
            S[i], S[j] = S[j], S[i]  # swap
            K = S[(S[i] + S[j]) % 256]
            yield K
    def RC4(key):
        S = KSA(key)
        return PRGA(S)
    def convert_key(s):
        return [ord(c) for c in s]

    key = K
    key = convert_key(key)
    keystream = RC4(key)
    ret = ""
    for i in xrange(sz):
        ret += chr(ord(buf[i]) ^ keystream.next())
    return ret

def read_buf(addr, sz):
    ret = ""
    for i in xrange(sz):
        ret += chr(Byte(addr+i))
    return ret

class dec_info:
    def __init__(self, addr):
        self.dec_start = Dword(addr)
        self.dec_len = Dword(addr+4)
    def print_data(self):
        print ("dec_info: start:{}, len:{}".format(self.dec_start, self.dec_len))

class key_info:
    def __init__(self, addr, isData=False):
        self.key_len = Dword(addr)
        self.key = read_buf(Dword(addr+4), self.key_len)
    def print_data(self):
        print ("key: len:{}, {}".format(self.key_len, repr(self.key)))

class data: # enc_data
    def __init__(self, addr, isData=False):
        self.type = Dword(addr)
        self.f4 = Dword(addr+4)
        self.sz = Dword(addr+8)
        self.enc_buf = read_buf(Dword(Dword(addr+12)), self.sz)
        self.dec_info_sz = Dword(addr+16)
        self.dec_infos = self.get_dec_info(Dword(addr+20), self.dec_info_sz)
        self.f18 = Dword(addr+24)
        self.key_info = key_info(Dword(addr+28))

        if isData:
            self.key_infos = [self.key_info]
            self.key_infos.append(key_info(Dword(addr+28)+8))
            self.key_infos.append(key_info(Dword(addr+28)+16))

    def get_dec_info(self, addr, sz):
        ret = []
        for i in xrange(sz):
            ret.append(dec_info(addr+i*8))
        assert len(ret) == sz
        return ret

    def print_data(self):
        print "=============================="
        print "type:", hex(self.type)
        print "size:", hex(self.sz)
        print "enc_buf:", map(hex, map(ord, list(self.enc_buf)))
        print "dec_info_sz:", hex(self.dec_info_sz)
        for i in xrange(self.dec_info_sz):
            self.dec_infos[i].print_data()
        self.key_info.print_data()

def do_xor(buf, sz, key, cc):
    ret = ""
    for i in xrange(sz):
        ret += (chr(ord(buf[i]) ^ ord(key)))
        key = chr((ord(key) + cc) & 0xff)
    return ret

def dec_code(code):
    return do_xor(code.enc_buf, code.sz, code.key_info.key, 0)

D = data(0x40cd00, isData=True)
def dec_data(d):
    enc = map(ord, list(d.enc_buf))
    keys = d.key_infos
    dinfos = d.dec_infos
    for idx, di in enumerate(dinfos):
        cur_pos = di.dec_start
        if idx % 3 == 0:
            tmp = idx
            end = cur_pos + di.dec_len
            while True:
                c = enc[cur_pos]
                tmp = (0x3039 - ctypes.c_int32(0x3E39B193 * tmp).value) & 0x7FFFFFFF
                c ^= tmp&0xff
                enc[cur_pos] = c
                cur_pos += 1
                if cur_pos >= end:
                    break
        elif idx % 3 == 1:
            end = cur_pos + di.dec_len
            while cur_pos < end:
                c = enc[cur_pos]
                v20 = (cur_pos - di.dec_start) % keys[1].key_len
                v21 = idx
                v22 = (cur_pos - di.dec_start)
                c ^= (ord(keys[1].key[v20]) + ctypes.c_int32(v21*v22).value)&0xff
                enc[cur_pos] = c
                cur_pos += 1
        elif idx % 3 == 2:
            res = rc4(di.dec_len, d.enc_buf[cur_pos::], keys[2].key)
            for i, c in enumerate(res):
                enc[i+cur_pos] = ord(c)
            res = do_xor(res, di.dec_len, chr(idx&0xff), (idx-1)&0xff)
            for i, c in enumerate(res):
                enc[i+cur_pos] = ord(c)
    return ''.join(chr(c) for c in enc)

with open("dec_data.vbs", "wb") as f:
    f.write(dec_data(D).replace("\x00", ""))

C = [] # code
addr1 = 0x40c2b0
for i in xrange(6):
    c.append(dec_code(data(addr1 + i*36)))

import pickle
# dump the decrypted machine code
with open("dec_code.dump", "wb") as f:
    pickle.dump(C, f)

print("Done")
After that we could see that the decrypted data is actully a VBScript.
There’s a PetMeLikeATurtle() function in the VBScript, which appears to be some kind of filter : it detect if there’s process like idaq.exe, x64dbg.exe… exist. If so, it won’t launch the process. I tried closing those processes and ran the program, but it still failed to launch ( on my PC and VM, both crashed eventually ).
Since the program won’t launch, I modified some code and save it as an html, then open it with my chrome browser:
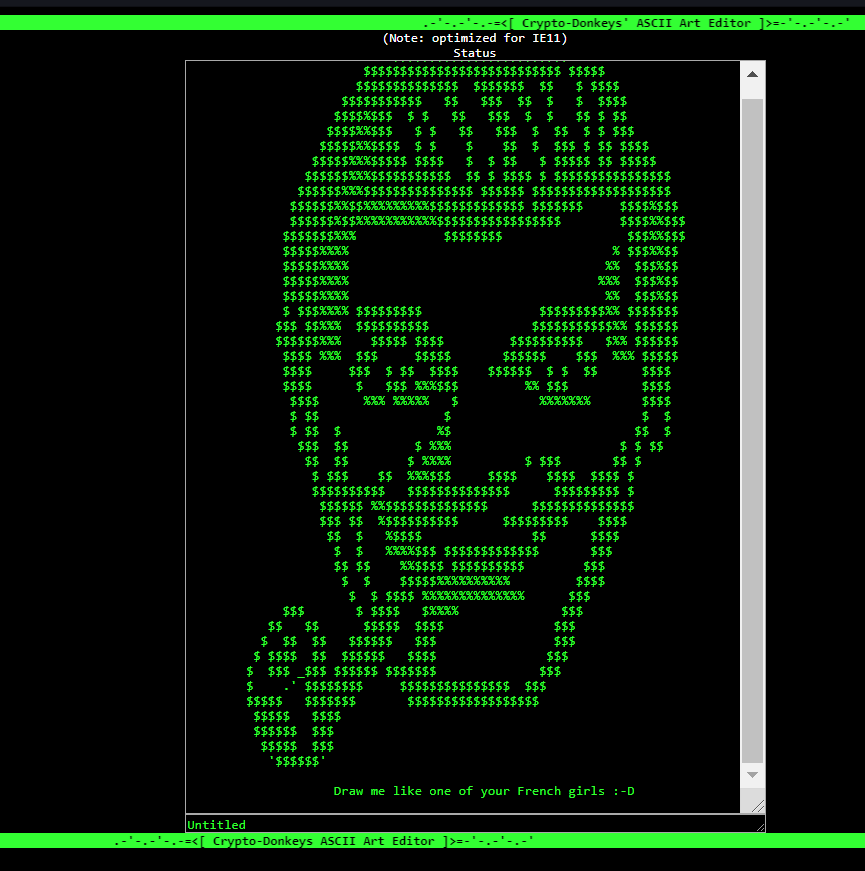
Basically it want us to input an ascii art and the title of the ascii art, then it will calculate the string hash of those strings and see if it matches the correct values. It it does, it will print out the flag.
So first we need the ascii art:
1
textin.value.indexOf('j##mmmmmmm6') != -1) && (strhash(textin.value) == 1164071950)
Here I noticed that the ascii art at the beginning of the vbscript contains the string j##mmmmmmm6:
1
2
3
4
5
6
7
8
9
10
11
12
13
14
15
'                               _a,
'                              _W#m,
'                             _Wmmmm/
'BmmBmmBmm[  Bmm             a#mmmmmB/        BmmBmmBm6a   3BmmBmmBm
'mmm[        mmm            j##mmmmmmm6       mmm   -4mm[  3mm[
'mBmLaaaa,   Bmm           JW#mmP 4mmmmL      mmBaaaa#mm'  3Bm6aaaa,
'mmmP!!"?'   mmm          JWmmmP   4mmmBL     Bmm!4X##"    3mmP????'
'Bmm[        Bmmaaaaa    jWmmm?     4mmmBL    mmm  !##L,   3BmLaasaa
'mmm[        mmm##Z#Z  _jWmmmmaaaaaa,]mBmm6.  mmB   "#Bm/  3mmm#UZ#Z
'                     _WBmmmmm#Z#Z#!  "mmmBm,
'                     ??!??#mmmm#!     "??!??
'                        .JmmmP'
'                       _jmmP'
'                      _JW?'
'                      "?
By testing the string hash with Chrome I confirmed that this is the correct ascii art. Now all we need is the title string:
1
title.value.indexOf('title') != -1) && (title.value.indexOf('FLARE') != -1) && (strhash(title.value) == -1497458761)
And this is when our decrypted code come into play.
Similar to level 6, I converted those machine code ( there are six of them ) into ELF binaries and reversed ( decompiled ) it with IDA Pro. Five of them aren’t that interesting, they’re just some functions that return the specific dll / funtion address ( and other normal stuff ). However, there’s one function that does a lot of things, including creating a COM object. This is the code that does the main function. After it create the COM object, I found that the assembly of the following instructions are kind of weird, and it turns out that those aren’t instructions – those are hint !
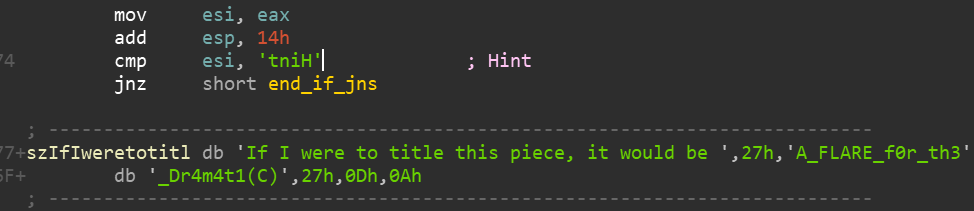
1
If I were to title this piece, it would be 'A_FLARE_f0r_th3_Dr4m4t1(C)'
This appears to be our title. We could confirm that by verifying the string hash.
Now all we need to do is to decrypted the flag with our key ( ascii art + title ). The decryption phase was implemented in the dispatch function of the COM object, which lies in leet_editr.exe. After some reversing we could figure out that it uses MD5 and RC4 to decrypt the flag:
1
flag = RC4(enc_buf, MD5(key))
We can then write a script to decrypt the flag. It appears to be an html:

LOL it did eat up my brain 😇
flag: scr1pt1ng_sl4ck1ng_and_h4ck1ng@flare-on.com
Level 10
How about a nice game of golf? Did you bring a visor? Just kidding, you’re not going outside any time soon. You’re going to be sitting at your computer all day trying to solve this.
hahaha, very funny ☝🙄…
Tools : IDA Pro + Windbg, TWindbg, Z3
Special thanks to Lucas for helping me on this one
We were given a 64 bit PE file. After some reversing, we know that:
- The program will write a file
fhv.sysinC:\, which appears to be a Windows driver. - Then it will load the driver and use the
vmcallinstruction to access the driver and check our input ( provided viaargv[1]). With this we know that this driver is actually a hypervisor. - The program will divide our input into four part and check it with four different code in hypervisor.
- The correct input is also the flag of this challenge.
The program will access the hypervisor with the vmcall instruction, it looks something like this:
1
vmcall(0x13687060i64, lpAddress, 4096i64);
The first argument is the vmcall number. The hypervisor will check the number and handle the vmcall with the corresponded function. The second argument is a memory buffer, which contains the “code” for checking our input. The third one is the length of the buffer, which is not important.
I was kind of stuck at the beginning, since the “code” in the memory buffer looks nothing like the x64 machine code:
1
['0xc8', '0xf0', '0x8', '0x0', '0x0', '0x0','0xc3', '0xf5', '0x28',.....
However, the program still managed to execute it without any problem. Something must has happened inside the hypervisor, so I started reversing fhv.sys. After a long period of time ( + some hint from Lucas ), I finally found that there’s a function which has lots of switch cases.
So it’s basically a VM : it reads a byte of code inside the buffer, handle it with the corresponed function, then jump to the next instruction, and it goes on and on….
To understand what exactly the hypervisor does, I decided to debug the driver with Windbg. By following the steps in these links ( 1, 2 ), I was able to get the hypervisor work on my Windows 7 x64 VM and set up the kernel debugging environment. I’m also using my own Windbg plugin TWindbg to help me analyze the memory and data structure more conveniently.

By tracing the code with debugger, I was able to understand all four parts of the vm code:
1
2
3
4
5
6
7
8
9
10
11
12
13
14
15
16
17
18
19
20
21
22
23
24
25
26
27
28
29
30
31
32
33
34
35
36
def code1(buf):
# buf: input[0:5]
    if buf[0] == 'W' and \
       buf[1] == "e" and \
       buf[2] == "4" and \
       buf[3] == "r" and \
       buf[4] == "_":
       return True

    return False

def code2(buf):
# buf: input[5:14]
    check = [0, 7, 0x2a, 3, 0x44, 0x6, 0x45, 0x7, 0x2a]
    for idx, c in enumerate(check):
        if buf[idx] != chr(0x75^ord(c)): return False
    return True

def code3(buf):
# buf: input[14:19]
    check = [0xa5, 0xb1, 0x2, 0x4c, 0xc5]
    c1 = 0x80
    for idx, c in check:
        if buf[idx] != ord(c)^c1^0x52: return False
        c1 += 0x52
    return True

def code4(buf):
# buf: input[19::]
    if buf[0] == 0x46 and \
       buf[4] == 0x33 and \
       sum(map(ord,buf)) == 0x16b and \
       buf[2] + buf[3] == 0x86 and \
       buf[1] + buf[2] == 0xa0:
       return True
    return False
Finally all we need to do is write some script to recover the flag:
1
2
3
4
5
6
7
8
9
10
11
12
13
14
15
16
17
18
19
20
21
22
23
24
25
26
27
28
29
30
31
32
33
34
35
36
37
38
39
40
41
from z3 import *

def decode2():
    check = [0, 7, 0x2a, 3, 0x44, 0x6, 0x45, 0x7, 0x2a]
    s = ""
    for c in check:
        s += chr(0x75^c)
    return s

def decode3():
    check = [0xa5, 0xb1, 0x2, 0x4c, 0xc5]
    c1 = 0x80
    s = ""
    for c in check:
        c78 = c^c1^0x52
        s += chr(c78&0xff)
        c1 += 0x52
    return s

def decode4():
    xs = [BitVec('x{}'.format(i), 8) for i in xrange(5)]
    s = Solver()

    for x in xs:
        s.add((x & ~0xff) == 0)
    s.add(xs[0] == 0x46)
    s.add(xs[4] == 0x33)
    s.add(xs[2] + xs[3] == 0x86)
    s.add(xs[1] + xs[2] == 0xa0)
    s.add(xs[0] + xs[1] + xs[2] + xs[3] + xs[4] == 0x16b)

    if s.check() == sat:
        m = s.model()
        f = ""
        for x in xs:
            f += chr(m[x].as_long())
        return f
    else:
        print("Unsat")

print("We4r_" + decode2() + decode3() + decode4())
flag: We4r_ur_v1s0r_w1th_Fl4R3@flare-on.com
Level 11
We captured some malware traffic, and the malware we think was responsible. You know the drill, if you reverse engineer and decode everything appropriately you will reveal a hidden message. This challenge thinks its the 9th but it turned out too hard, so we made it the 11th.
Tools : IDA Pro + Windbg, pwntools, dll_to_exe, Wireshark, dnSpy, Stegsolve
This one was a hell lot of work….
First we were given a Delphi compiled PE file and a pcap file, which contains some suspicious traffics. The Delphi program will decrpyt a code buffer using xor and execute the code. We can dump the code with IDAPython, convert it to an ELF ( using pwntools ) then decompiled the binary with IDA Pro.
The shellcode will do the followings:
- Open several DNS requests, each of them will respond with a part of a ciphertext ( corresponded to those DNS requests in the pcap file).
- After receiving all the ciphertext, it will process the ciphertext with some shift-and operation, then use a custom RC4 algorithm to decrpyt the ciphertext, which appears to be another PE file (dll).
Here I used strings to extract the ciphertext from the pcap file, and decrpyt it with a simple python script.
Now the real challenge begin … the dll is a 32 bit, VC++ program, which is pretty similar to last year’s challenge 12 ( which I failed to solve…)
The program is kind of complicated : it has lots of classes and functions, lots of vtables, the external library calls are determined by a unique hash value,…etc. Here’s how I analyze this monster:
- Since this program is responsible for the TCP traffics in the pcap file, I wrote a simple replayer to replay the packets inside the pcap file. This would made the program receive the correct packets so it won’t exit the process immediately.
- Set up an environment for debugging the program. Here I modified the content of
C:\WINDOWS\system32\drivers\etc\hoststo let Windows translate the malicious domainanalytics.notatallsuspicio.usinto192.168.XXX.XXX, which is a Linux VM that runs the replayer server. - Convert the dll into exe with dll_to_exe, then use IDA Pro + Windbg combo to analyze the program. By inspecting the behavior of the program, we can slowly rename some function pointer variables, recover data structures, understand the algorithm that program used for compression/encryption/….. etc.
After DAYS of reversing & debugging, I finally figured out the main program logic:
- Once the program connect to the C&C server, both will exchange a 48 bytes long random value, which its first 16 bytes will be treated as the AES-128 encryption key ( the last 32 bytes will be used for sha256, which is not important in this challenge )
- They communicate via a custom binary protocol, which look something like this:
1
2
3
0x6b 0x00 0x00  // length
0x8f // must be 0x8f
0xXX ......   // data
- The
datapart is an encrpyted & compressed data, which will need to be decrypted withAES-128(OFB mode) and decompress withdeflate. - After we recover the real data, it’s a structure looks something like this:
1
2
3
4
5
6
7
8
9
10
struct config {
 DWORD hash;  // For checking
 DWORD sig;   // Must be 0x20180301
 DWORD class_id; // Which class to use
 DWORD type; // Which type to handle
 DWORD f10; // Don't care
 DWORD f14; // Don't care
 DWORD f18; // Don't care
 char data[]; // Various content. May be a command string or something else
}
- Each
configwill determine what action will the client take. There are several classes in the program, each of them represent a type of an action:CMD( command class ),CRYPT( encrpytion class ),COMP( compression class )…etc. Each class has several handler functions that will handle atypeof an action. For example,class_12:type_0means open a network connection,class_12:type_1means close a network connection, ….etc. - The program will keep doing things base on the
configdata sended by the C&C server.
With these informations I started decrypting the packets in the pcap file. Here’s part of the result:
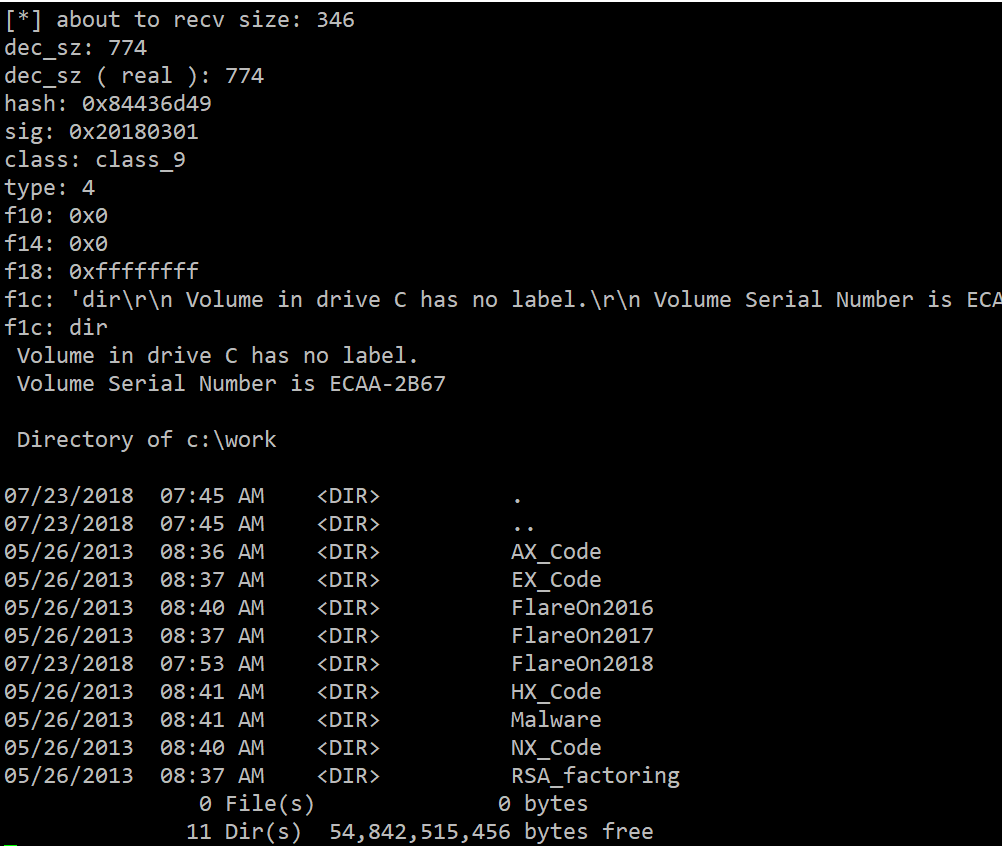
Based on the result of the decryption, we can sort out some stuff:
- The victim ( a.k.a the client ) will connected to larry-johnson’s PC.
- It will connected to a web page, which will reveal some informations about the challenge.
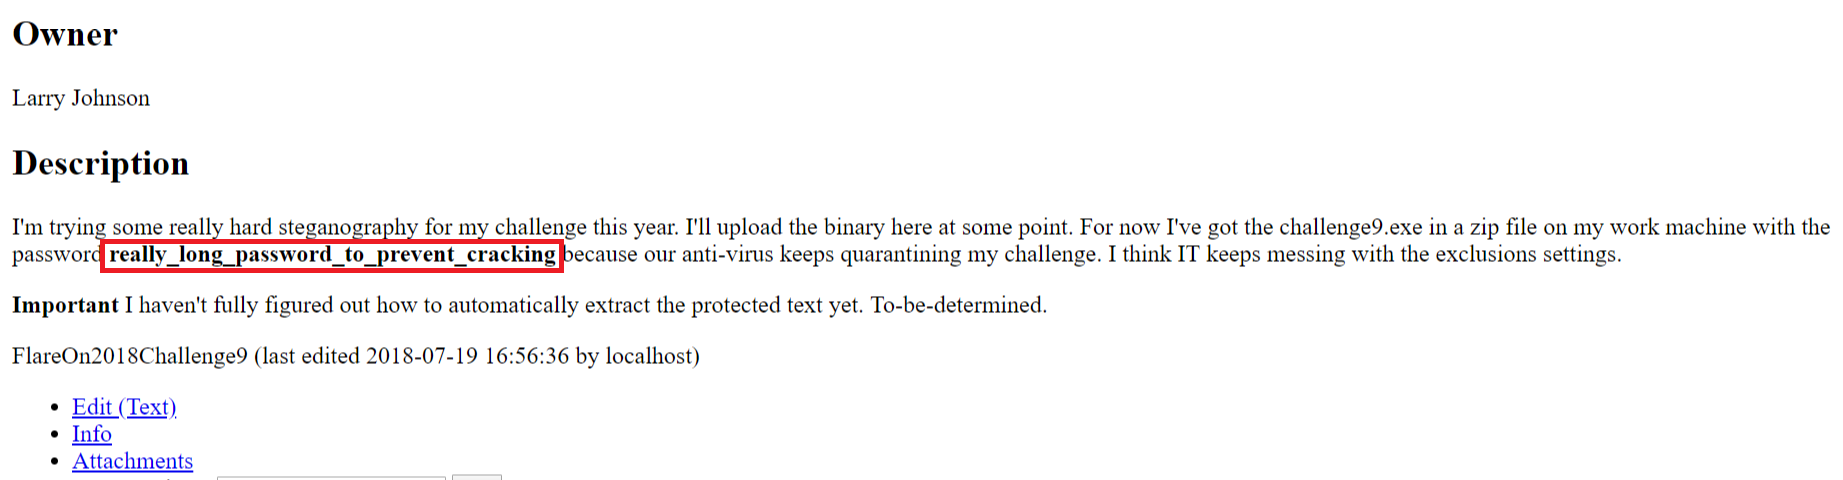
- Inside the web page there’s a html file, which has the following content :
- A file called
level9.crypthas been uploaded to the C&C server.
We can extract level9.crypt by dumping the data in pcap. But as you can see, it’s encrypted. I got stuck here for a while, until I found that there’s another suspicious traffic between the victim and larry-johnson’s PC. Turn out to be that they were also communicating via the custom binary protocol, except this time there weren’t using the TCP connection : the data was transferred via the SMB protocol.
So again, we’ll have to extract the data from those SMB request, then decrpyt & decompress those datas to see what they were doing :
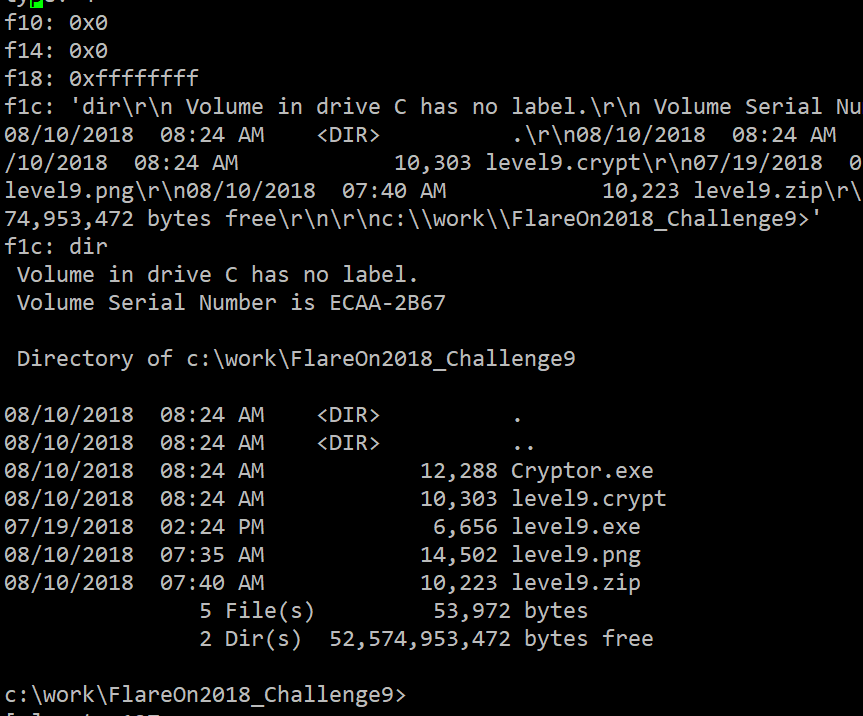
So what it did was :
- It uploaded a
Cryptor.exeto larry-johnson’s PC - It encrypted the
level9.zipintolevel9.cryptand uploaded it to the C&C server
We could extract the Cryptor.exe from the decrpyted packets. It’s a .NET binary.
By analyzing the program with dnSpy, we know that:
- It will load the remote data from here, do some operation, and treat it as AES-128’s key & IV
- By judging the encrypted file’s header, the remote data’s timestamp should be 2018/08/10, so we actually have to retrieve the remote data from here
- After that it just do the AES-128 encryption ( with PKCS7 padding ) and write the encrypted data ( along with some meta datas ) into the output file.
With the help of this link I was able to recover the level9.zip, and unzip it with the password ( really_long_password_to_prevent_cracking ) .
After that we’re not done yet … now we’re left with two files : level9.exe and level9.png. level9.exe is another .NET program, which just does some simple stenography ( something like drawString() in a picture ). By the time I came to this step it’s about 3:00 am and I’m very tired, so I just open level9.png with Stegsolve and hope it will work…..
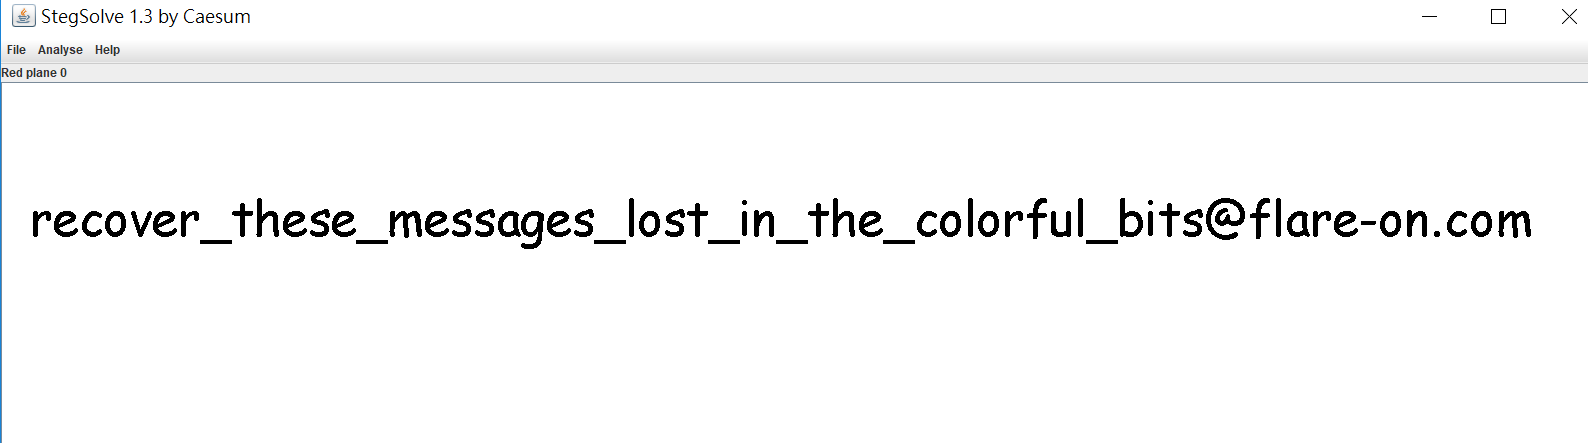
THANK. GOODNESS.
flag: recover_these_messages_lost_in_the_colorful_bits@flare-on.com
Level 12
Now for the final test of your focus and dedication. We found a floppy disk that was given to spies to transmit secret messages. The spies were also given the password, we don’t have that information, but see if you can figure out the message anyway. You are saving lives.
Tools : qemu, DOSBox, IDA Pro, Bochs emulator
Again thanks to Lays for helping me on this one
Well here we are, final challenge, our worst nightmare.
Given a suspicious_floppy_v1.0.img, I first ran it with qemu :
1
qemu-system-i386 -fda ./suspicious_floppy_v1.0.img
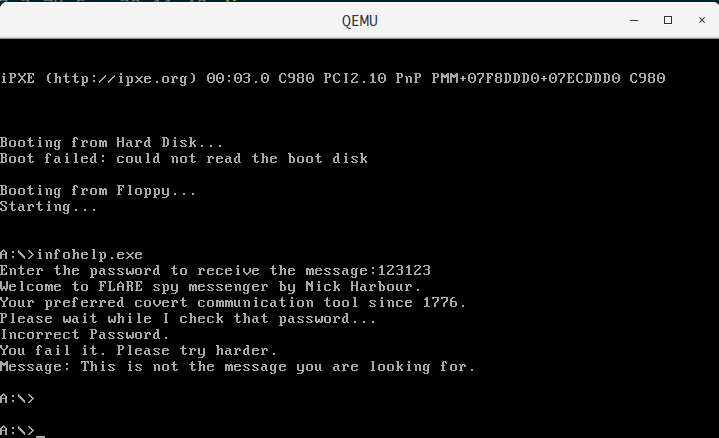
As we can see it ask for the correct password.
Since it’s an image file, we can actually mount it as a directory and look around inside the folder. Here I found that infohelp.exe is an MS-DOS executable, so I tried dynamic analyze the program with DOSBox:

🤔hmmm…that was strange…cause now the program did not print out the Welcome to FLARE spy messenger... message, also it looks like it did not check our password.
So apparently there’s something inside the image file that does the password checking, and it’s definitely not infohelp.exe.
According to Lays, the program hook int 0x21 and jump to the code that does the password checking during the file operation of “message.dat”.
To locate the actual code, I decided to switch my analyzing tool to IDA and Bochs emulator. By suspending the execution during the password checking stage, we can locate the code and re-implement it with the following pseudo code:
1
2
3
4
5
6
7
8
9
10
11
12
13
14
15
16
17
18
19
20
21
22
23
24
25
26
27
28
29
30
31
32
33
34
35
36
37
38
39
40
41
42
43
44
45
46
47
48
49
50
51
52
53
54
55
56
57
58
59
short addr = 0x223;
int subleq(short f1, short f2, short f3)
{
    short bx=0, ax=0, dx=0;

    bx = (f1 << 1)&0xffff;
    ax = Word(addr+bx);
    int idx1 = addr+bx;
    bx = (f2 << 1)&0xffff;
    dx = Word(addr+bx);
    int idx2 = addr+bx;

    dx = (dx - ax)&0xffff;
    bx = (f2 << 1)&0xffff;
    patch_word(addr+bx, dx);

    ax = f3&0xffff;

    if (ax != 0)
    {
        if (dx <= 0) return 1;
    }
    return 0;
}

int main(int argc, char *argv[])
{
    short now = 5;
    short f1=0, f2=0, f3=0;
    while (now+3 <= 0x2dad)
    {
        cnt += 1;
        short bx = (now<<1)&0xffff;
        f1 = Word(addr+bx);
        f2 = Word(addr+bx+2);
        f3 = Word(addr+bx+4);
        if (subleq(f1, f2, f3) == 0)
        {
            now += 3;
            if(Word(addr+8) != 0) print_char();
        }
        else
        {
            bx = (((now+2)&0xffff)<<1)&0xffff;
            short tmp = Word(addr+bx);
            if(tmp == 0xffff)
            {
                puts("Done");
                break;
            }
            else
            {
                now = tmp;
            }
            if(Word(addr+8) != 0) print_char();
        }
    }
    return 0;
}
Well well well…looks like we meet again … subleq ;)
So it’s similar to last year’s challenge 11 – it’s a subleq VM, an OISC which only contains the subleq instruction. To analyze and understand what the VM does, there’re two approaches:
- Instrument the binary
- Write a disassembler
Since last year I solved the challenge with instrumentation, I decided to use the same approach as well : re-implement the subleq VM, add some code to print out the execution trace, then examine the trace and try figure out what it actually does.
And it turned out to be a huge failure…
First of all, the amount of the execution trace is ridiculously large – over 10 GB of trace data. Even later I implemented a simple taint engine to filter out the irrelevant data, I still got like about 500MB+ of data. This made the examination extremely hard.
With this approach I could only figured out:
- The password format is
XXX@yyy - The program will add up the string before
@- e.g.
123@abc–>sum("123")=0x31+0x32+0x33=0x96
- e.g.
- The program will keep doing the following operation:
1
2 * ((ord(password[i+1])-0x20)*0x80 + (password[i]-0x20)) + 1
After getting stuck on instrumentation for about a week, I decided to get some help from Lays. He suggested me using the second approach ( write a disassembler ), also he told me that reading the write-up authored by Nick Harbour ( challenge author of this challenge and challenge 11 from previous year ) would help me understand how the VM works.
So I started writing the disassembler for the subleq VM. With the help of the write-up and the wikipedia, I developed a tiny disassembler which will disassemble the VM into instructions like JMP, MOV and ADD. Here’s the partial disassembling result:
1
2
3
4
5
6
7
8
9
10
11
12
13
14
0x22d: JMP 0x235
0x235: MOVE [0x27d], [0x419]
0x24d: MOVE [0x27f], [0x419]
0x265: MOVE [0x28b], [0x419]
0x27d: subleq [0x223] [0x223] [0x223]
0x283: subleq [0x233] [0x223] [0x223]
0x289: subleq [0x223] [0x223] [0x223]
0x28f: subleq [0x223] [0x223] [0x223]
0x295: JMP 0x29d
0x29d: ADD [0x419], [0x29b]
0x2af: JMP 0x2b7
0x2b7: MOVE [0x2b5], [0x2d5]
0x2cf: JMP 0x2d7
.............
At first glance it looks kind of messy, however we could simplify the code base on some special patterns.
For example, we split the first couple of lines into four parts:
1
2
3
4
5
6
7
8
9
10
11
12
13
14
15
16
17
18
19
20
21
22
23
24
25
26
27
28
29
30
31
32
33
34
35
36
37
38
// part 1
0x235: MOVE [0x27d], [0x419]
0x24d: MOVE [0x27f], [0x419]
0x265: MOVE [0x28b], [0x419]
0x27d: subleq [0x223] [0x223] [0x223]
0x283: subleq [0x233] [0x223] [0x223] // 0x233: 0x2b57
0x289: subleq [0x223] [0x223] [0x223]
0x28f: subleq [0x223] [0x223] [0x223]
0x295: JMP 0x29d
0x29d: ADD [0x419], [0x29b]
0x2af: JMP 0x2b7
// part 2
0x2b7: MOVE [0x2b5], [0x2d5]
0x2cf: JMP 0x2d7
0x2d7: MOVE [0x31f], [0x419]
0x2ef: MOVE [0x321], [0x419]
0x307: MOVE [0x32d], [0x419]
0x31f: subleq [0x223] [0x223] [0x223]
0x325: subleq [0x2b5] [0x223] [0x223] // 0x2b5: 0x7f6
0x32b: subleq [0x223] [0x223] [0x223]
0x331: subleq [0x223] [0x223] [0x223]
0x337: JMP 0x33f
0x33f: ADD [0x419], [0x33d]
0x351: JMP 0x359
// part 3
0x359: MOVE [0x357], [0x377]
0x371: JMP 0x379
0x379: MOVE [0x3c1], [0x419]
0x391: MOVE [0x3c3], [0x419]
0x3a9: MOVE [0x3cf], [0x419]
0x3c1: subleq [0x223] [0x223] [0x223]
0x3c7: subleq [0x357] [0x223] [0x223]
0x3cd: subleq [0x223] [0x223] [0x223]
0x3d3: subleq [0x223] [0x223] [0x223]
0x3d9: JMP 0x3e1
0x3e1: ADD [0x419], [0x3df]
// part 4
0x3f3: JMP 0x41b
We could notice that part 1, part 2 & part 3 looks pretty much the same. According to the source code in Nick’s write-up, we could figure out that it’s actually doing PUSH, and 0x419 is actually our sp. Also according to this article, we know that a function call in subleq VM can be splitted into following steps:
- push arg_n
- push arg_n-1
- …..
- push arg_1
- push ret_address
- jmp to function address
- pop
So the above example could actually be reduced into:
1
2
3
4
5
push 0x25b7
push 0x7f6
push return_address
jmp func1
.....
which then could be reduced into:
1
call func1(0x7f6, 0x25b7)
Using the above strategy, I was able to identify some code patterns such as function call, function’s prologue & epilogue, BEQ & BNEQ, …etc. Put it all together we can actually recover the program logic of the VM.
I was expecting to see something like:
1
2
3
4
5
print_string("Welcome.....")
if(check_pass(input_string))
    // success
else:
    // failed
But instead, it gave me this:
1
2
3
4
5
6
7
8
9
10
11
12
13
14
15
16
17
18
19
20
21
22
23
24
25
26
27
28
29
30
31
32
33
34
35
36
37
# Word: read memory
# patch_word: write memory

import numpy

def func2():
    _120f = Word(0x120f)
    cur_addr = (((0x7f6+ _120f )<<1)+0x223)&0xffff
    _1201 = Word(cur_addr)
    if _1201 == 0xffff:
        _120f += 1
        patch_word(0x120f, _120f)
        return

    cur = (((0x7f6+ _1201 )<<1)+0x223)&0xffff
    _120b = Word(cur)
    _11ff = numpy.int16((_120b - Word(0x1211)))
    patch_word(0x1211, _11ff) # 0x1211 = acc

    if _11ff < 0:
        _120f += 2
    else:
        _120f += 1

    patch_word(0x120f, _120f)

def func1():
    while True:
        _120f = Word(0x120f)
        if _120f >= 0x2b57:
            return
        tmp = Word((((0x7f6+ _120f )<<1)+0x223)&0xffff)
        if tmp == -2:
            return
        func2()

func1()
…… what the hell is this ? It shows no sign of printing string, let alone checking the password. After examine it carefully, I suddenly realized……
Holy shit it’s a subleq2 VM…
1
2
3
subleq2 a, b     ; Mem[a] = Mem[a] - ACCUM
                 ; ACCUM = Mem[a]
                 ; if (Mem[a] ≤ 0) goto b
We can tell that _120f is the PC address, _1201 is a, and _1211 being the accumulator(ACCUM) … it’s a subleq2 inside a subleq !!

EDIT: Ah…so after I read the official write-up, it’s actually not subleq2 but a RSSB (Reverse subtract and skip if borrow) VM. It looks kind of like subleq2, and I got confused 😛
So once again, I had to write another disassebler for subleq2 RSSB. Based on the first one and with some modification, I created another tiny disassembler. It can only identify instructions like MOV, ADD, SUB……, but again, we could simplify the code base on some special patterns. After identifying some function calls, I was able to recover the whole program logic, and this time the result is much more reasonable :
1
2
3
4
5
6
7
8
9
10
11
12
13
14
15
16
17
18
19
20
21
22
23
24
25
26
27
28
29
30
31
32
33
34
35
36
37
38
39
40
41
42
43
44
45
46
47
48
49
50
51
52
53
54
55
56
57
58
59
60
61
62
#!/usr/bin/env python
# -*- coding: utf-8 -*-

import ctypes

def int16(v):
    return ctypes.c_int16(v).value

check = [0xFC7F,
         0xF30F,
         0xF361,
         0xF151,
         0xF886,
         0xF3D1,
         0xDB57,
         0xD9D5,
         0xE26E,
         0xF8CD,
         0xF969,
         0xD90C,
         0xF821,
         0xF181,
         0xF85F]

def check_password(input_string):
    # add up string before @
    sum_before_at = 0
    for c in input_string:
        if c == "@":
            break
        sum_before_at += ord(c)

    for i in xrange(15):
        c1 = input_string[i*2]
        c2 = input_string[i*2+1]
        _4ff3 = int16((ord(c2)-0x20)*0x80 + (ord(c1)-0x20))
        _4ff5 = int16((now<<5) + now)
        _4ffb = 0

        for _ in xrange(0x10):
            _4ff7, _4ff9 = 0, 0
            if _4ff3 < 0: _4ff7 = 1
            if _4ff5 < 0: _4ff9 = 1

            if _4ff7 + _4ff9 == 1:
                _4ff7 = 1
            else:
                _4ff7 = 0

            _4ffb = int16(2*_4ffb + _4ff7)
            _4ff3 = int16(2*_4ff3+1)
            _4ff5 = int16(2*_4ff5+1)

        if (_4ffb + sum_before_at)&0xffff != check[i]&0xffff:
            return False
    return True

print("Welcome to.....") # Welcome message
if check_password(input_string):
    print("Password Matched...") # Success
else:
    print("Incorrect password...") # Failed
We finally have the entire password checking logic ! Now all we need to do is crack that password ! Base on the checking logic and the password’s format, we know that:
- Password’s length is 30
- It should look something like
XXXXXXXXXXXXXXXXX@flare-on.com
Take a look at the checking logic:
1
2
if (_4ffb + sum_before_at)&0xffff != check[i]&0xffff:
    return False
In order to crack the password we’ll need three informations :
_4ffbsum_before_atcheck[i]
We already know the value of check[i]. _4ffb is calculated by password[i] and password[i+1], which is also a known value ( by using the known part of the password – @flare-on.com). With check[i] and _4ffb we then can infer & calculate the value of sum_before_at, which is 0xd15e.
After that just write a simple python script to brute-force the password:
1
2
3
4
5
6
7
8
9
10
11
12
13
14
15
16
17
18
19
20
21
22
23
24
25
26
27
28
29
30
31
32
33
34
35
36
37
38
39
40
41
42
43
44
45
46
47
48
49
50
51
52
53
54
55
56
57
58
59
#!/usr/bin/env python
# -*- coding: utf-8 -*-

import ctypes
import string
import itertools

sss = string.letters + string.digits + "_@"

# we only need to brute-force the first 9 groups of the password
check = [0xFC7F,
	 0xF30F,
	 0xF361,
	 0xF151,
	 0xF886,
	 0xF3D1,
	 0xDB57,
	 0xD9D5,
	 0xE26E]

flag = ""

def int16(v):
    return ctypes.c_int16(v).value

def sol(now, c):
    global flag
    c1 = c[0]
    c2 = c[1]
    _4ff3 = int16((ord(c2)-0x20)*0x80 + (ord(c1)-0x20))
    _4ff5 = int16((now<<5) + now)
    _4ffb = 0
    for i in xrange(0x10):
        _4ff7, _4ff9 = 0, 0
        if _4ff3 < 0: _4ff7 = 1
        if _4ff5 < 0: _4ff9 = 1

        if _4ff7 + _4ff9 == 1:
            _4ff7 = 1
        else:
            _4ff7 = 0

        _4ffb = int16(2*_4ffb + _4ff7)
        _4ff3 = int16(2*_4ff3+1)
        _4ff5 = int16(2*_4ff5+1)

    if (_4ffb + 0xd15e)&0xffff == check[now]&0xffff:
        flag += c1+c2
        return True
    return False

now = 0
while now < len(check):
    for c in itertools.product(sss, repeat=2):
        temp = ''.join(c)
        if sol(now, c):
            now += 1
            break
print flag
We then got the password: Av0cad0_Love_2018@flare-on.com
And now the moment of truth…
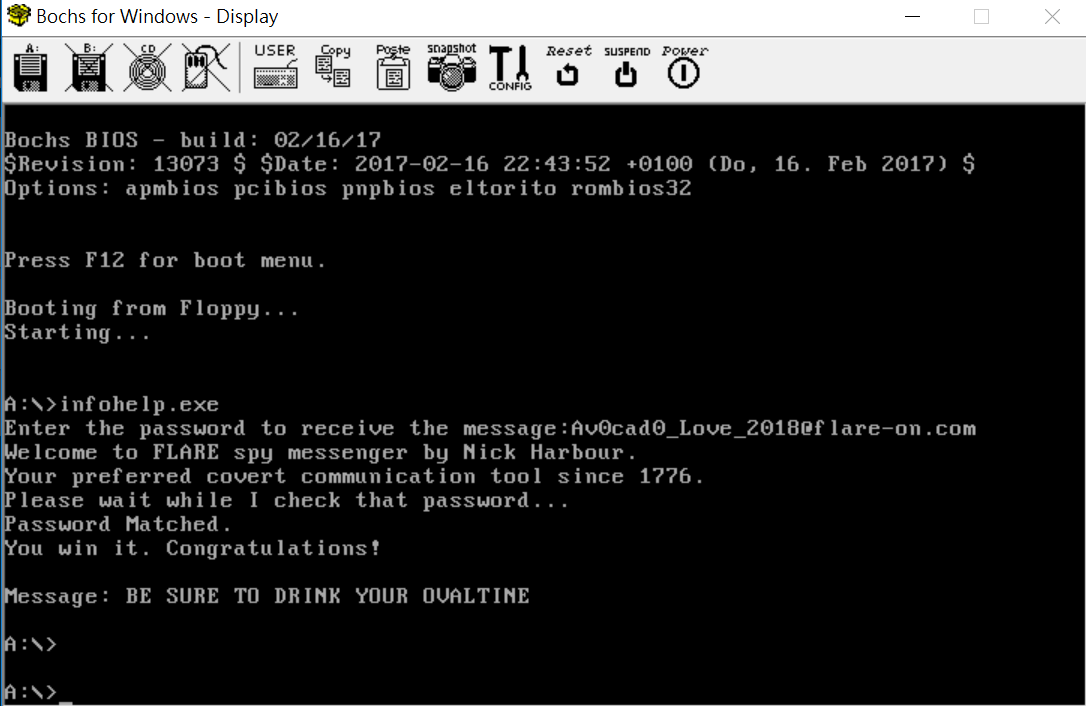
Hurray ! We’ve conquered the final challenge of Flare-on 2018 ! 🎉 🎉 🎉
Epilogue
The challenges are pretty good overall. I’ve gained a lot during this CTF, especially on reversing Windows PE and VM. Although level 8 is kind of guessy, and level 12 being super inhumane (?), it’s still a pretty nice reversing challenge.
Big thanks to FireEye for creating those amazing challenges. Also let’s not forget those guys from CTFd, they did a pretty good job on hosting the CTF platform. Special thanks to Lays and Lucas for discussing and helping me on level 9, 10 & 12.
Feels good to complete the challenge 😊 Hope I could do it again next year !
Till next time ! 😁
![]()